2006
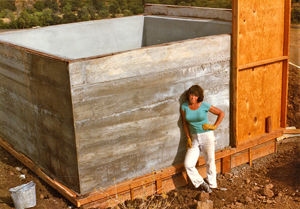
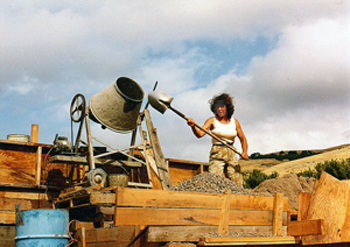 Dorothy building holding tank
Build a 6,500 gallon concrete water tank for $1500
by Dorothy Ainsworth
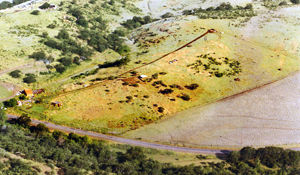 Dorothy's 10 acres
When I bought ten dry, barren, affordable acres back in 1981, I got what I paid for: no electricity, no septic system, no well, and no water. What I did get was a long narrow rectangle, carpeted with star thistle and poison oak, situated on the southern face of a hill (500' x 1320'). Buying bare land was a big gamble, but I wanted my own piece of dirt so badly, I could taste it...if only I had some water to wash it down with. Thanks to the local well driller and good ol' Mother Nature, I got that drink of water. I lucked out and struck it rich with a 50-GPM well at a depth of 150 feet, for $3,000.
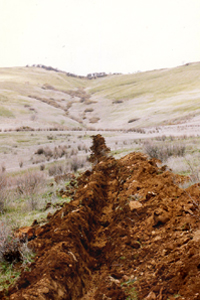 1/4 mile trench to holding tank site
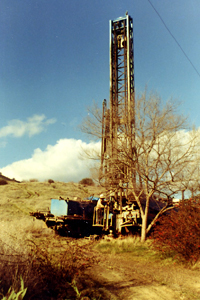 Well driller 1981
 Submersible well-pump
The next steps were basic. I procured the appropriate permits, built a pump house around the well casing, set a power pole, wired in an electrical box and meter, and called the inspector.
When all my lifelines were hooked up, I installed a submersible pump from Sears by following the do-it-yourself instructions. To my amazement, when I turned on the control box, water spewed right up out of the pipe! Now I could get serious about improving the property. I'd start with a water storage tank because I believe that you are only as secure as your water supply.
To take advantage of gravity for water on demand, the logical place to put a holding tank was at the top of the hill, although the well was at the bottom. I called a backhoe man to dig a three-foot-deep trench 1/4 mile long and level a spot at the top end for a 12'x12'x 6' concrete tank (6500-gallon capacity).
 Shoveling tons of gravel
The 2-HP submerged pump in the well would fill the tank via a 1 1/2" PVC pipe buried in the trench. When the tank was full, I'd use the same pipe to gravity-feed water to supply all my household and irrigation needs. Every 60 feet down the line I would put a 1" PVC riser sticking up out of the main pipe and cap it with a non-siphoning valve for irrigation. I would later put in 1" PVC pipes underground off that main line as needed to supply my various structures as I built them.
With a holding tank, I would have the security of a week's or month's supply of water at a time (depending on the season) if the electricity went off for any reason. A stored supply would also save the pump motor from having to cycle on and off whenever a faucet was turned on. My storage tank would fill up in about 4 hours; then the pump would rest, and the well would replenish itself. It sounded like a good plan, so I got busy hauling gravel. I would need tons of it!
I found a source for cheap crushed gravel (3/4 minus, meaning no rocks bigger than 3/4"), but, again you get what you pay for...I had to load it myself. I hauled a yard or two a day in my pickup until I stockpiled enough to build the tank. I had it down to a science: each load took 300 shovels full. When the tires were flattened just so, I knew that that amount of too much was just enough. I'd creep home, front end floating, turn into my driveway and step on it full throttle to get a run at the hill, fish-tailing all the way to the top. (I had no roads yet.) Poor old Bessie, my 1971 half-ton Ford pickup, has endured cruel and unusual punishment for 20 years, hauling a hundred 1-ton loads of gravel for roads and 780 logs for houses, but she's still going strong.
It took 2 weeks of shoveling rock to have enough for the job, but loading and unloading the truck 20 times was just the half of it! Each of those 6,000 shovels full of gravel would have to be lifted again...either thrown on the ground to level the pad, or heaved into a cement mixer with sand and cement and water, then dumped and tamped into forms. I looked forward to the day when the cruel gruel would be entombed forever in the shape of a tank.
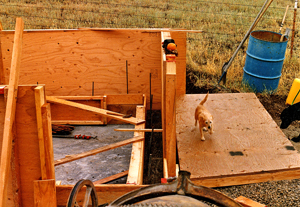
The floor
 Tank floor & wall forms covered with gravel
 Floor poured
 Bill of All Trades tamping wet concrete
I had no electricity on top of the hill,
so I borrowed a cement mixer and a gas-powered generator from a neighbor. He
was a Bill of All Trades who also did everything the hard way to
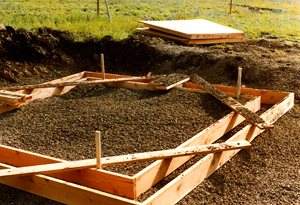
save money.I paid him what I could to help me with the general layout of the
tank site, which consisted of setting up batter boards and making sure
everything was plumb, level, and square. I covered the large pad where the
tank would sit with about 8" of gravel as a base. Then we built the forms out
of 2"x8" lumber, set the 2" dia. PVC drain pipe in place, and poured the
8-inch thick floor in 2 grueling days (32 mixers full = 4 cubic yards).
We used a garden rake and a shovel to evenly distribute the mix around and
work it into every corner. Together we dragged a 2"x6" on edge across the
surface of the wet concrete floor, using the tops of the forms as guides...a
procedure called screeding. Bill advised me to use no rebar in the slab
because it would be filled with water inside and sitting on wet ground outside
and the rebar would eventually rust, leaving voids that would weaken the
concrete. Right or wrong, I had no experience to question him, so that's how
we did it.
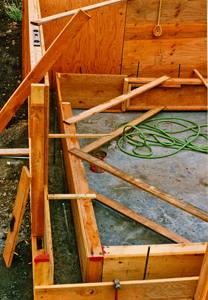
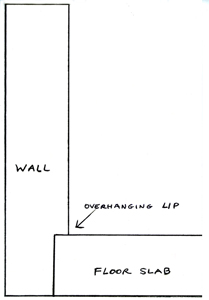
Before the floor set up as hard as a rock, we roughed up the sides of the slab and a 2-inch wide strip around the top perimeter to serve as a keyway (an overhanging lip) to help tie the vertical walls to the floor. We used 5/8" plywood nailed to 2"x4" frames for the 8-inch thick walls. I sprayed the sheets of plywood with a petroleum-based oil (using a garden sprayer) so they wouldn't stick to the concrete when it was time for removing and repositioning them.
 Wall forms
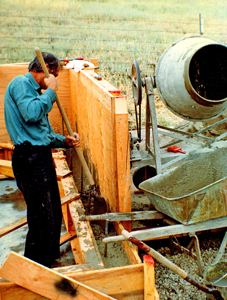
We secured vertical rebar at 2-foot intervals inside the wall cavities. Bill helped me with the floor, but then he had to go to another job, so I carried on solo. A cubic yard and a half of concrete was all I was physically capable of shoveling, pouring, distributing, and tamping in 12 hours. I let each daily pour set up, then moved the forms up, and raised the cement mixer platform and piles of ingredients to the new level. Bill stopped by on his way home from work each day to help me lift the heavy stuff.
A series of separate pours meant cold joints...the lines of demarcation between pours. If the preceding surface is roughed up while the concrete is still green (firm but fresh), the next layer bonds just fine. It's not as ideal as a monolithic pour, but it was the only doable method for me.
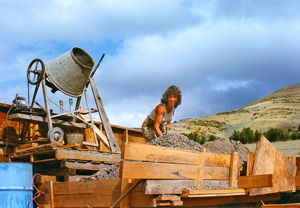 Cement mixer raised higher as wall pours go up
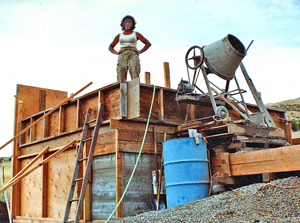 Dorothy after the last pour
The recipe
There are three basic mixtures that are commonly used for concrete construction, from strongest to strong enough. They differ in the ratio of the three basic ingredients: cement, sand, and stone. How they are proportioned makes a huge difference in strength and durability. The more cement, the stronger (richer) the mix, with 1:2:4 being a happy medium for most projects. The less water you can use in relation to the dry ingredients and still maintain a workable consistency, the stronger the mix. A runny mix is weak.
The consistency of freshly-mixed concrete should feel like oatmeal cookie batter...but don't lick your fingers! The trick is not to touch the mix at all with bare hands. For a novice, that's easier said than done because it's tempting to catch the drips and smear them around.
Because Portland cement has abrasive silica and caustic lime in it, I ended up with no fingerprints at all until the tread grew back. It would have been a good time to take up a life of crime, but I stayed on the straight and narrow...and plumb!
When you make a batch of concrete, the sum of the ingredients mixed together will result in a much smaller volume than the separate components...kind of like what happens to that mountain of flour when you make a loaf of bread, or when you can't believe you just used 1/2 gallon of ice cream to make only two decent-sized milkshakes!
Bill advised me to use a 1:3:5 mix: 1 heaping shovel of cement to 3 of sand and 5 of gravel. For me, that mixture would be economical for my budget and yet strong enough for my particular application: a heavy foundation and thick retaining walls. Because the tank would be sitting on impenetrable hard rock, I knew it would have to be back-filled to bury it partially underground, which would also help equalize the pressure on the walls. (Water weight pushes out; wall of dirt pushes in.) Backfilling would also keep the water cool in the summer and prevent freezing in the winter.
Calculating what you need
Using simple math, I estimated the walls would require 8 cubic yards. Here's how: Multiply length (12') x height (6') x thickness (3/4 of a foot = .75) x four walls and divide by 27 because there are 27 cu.ft. in one cubic yard.
The walls
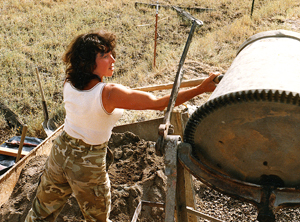 Shoveled for 9 hours straight one day
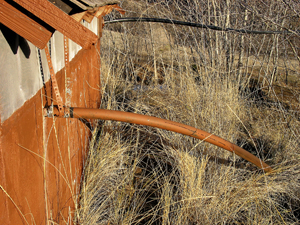 Overflow pipe to pond
The growling, gyrating cement mixer held about 1/8 cu.yd. (approx. 3.5 cu.ft.) at a time, gobbling up 2 shovels of cement, 6 shovels of sand, 10 shovels of gravel. I worked as fast as I could slinging them in, counting and alternating the ingredients very carefully, while constantly adding water with a measuring bucket...about 4 gallons. (Water was available from the pipe in the trench.)
When the batter was just right I shut off the motor, swung the cement mixer around on its axis and dumped the load into the forms. Then I tamped, tamped, and tamped with the business end of a short shovel. I also tapped the sides of the forms with a hammer to vibrate the concrete into every nook and cranny. On the fifth and final pour, I set a pipe through the wall near the top to make an overflow hole. I would later run a 1 1/2" polypipe through that hole and out to my pond.
Each daily pour amounted to 12 mixers full, which totaled 24 shovels of cement, 72 shovels of sand, 120 shovels of gravel, and 48 gallons of water. I guzzled another 10 gallons of water and dumped even more on my head. It took a week of working from daybreak to backbreak to complete the walls. The whole project had to be a marathon because concrete sets up fast in extreme heat, and time was running out on my vacation from waitressing.
Needless to say, I put my fitness center membership on hold for a while. "Sixteen Tons" by Tennessee Ernie Ford was my theme song for the week, although the tank ended up weighing 24 tons. Blistered hands on Monday had turned into lobster claws by Friday.
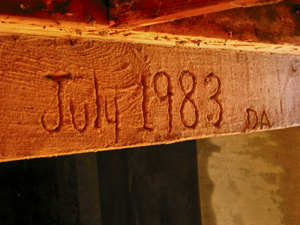 Date completed and my initials
The roof
 Ready to strip off forms
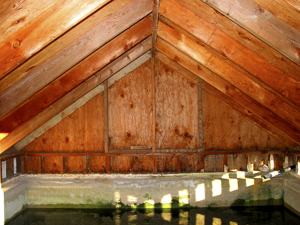 Roof over tank
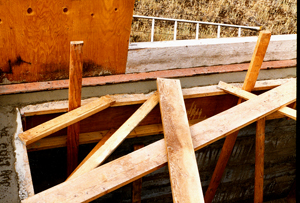
On top of the last pour I dragged a short 2"x6" on edge across the 8-inch wide wet surfaces to smooth them out. I then set four 2"x4" pressure-treated sill-plates in the concrete and leveled them with a long level while tamping and wiggling them into place around the outside perimeter, making sure the corners were squared. I would later drill a few holes down through the sill-plates and into the green concrete, and install anchor bolts (1/2"x 6") to secure the plates to the walls. (The bolts should have been set first but it was impossible for me to do it alone.)
The sill-plates would be an integral part of the roof construction, providing a wood surface to build a short stem wall on. The pony wall would be screened for cross-ventilation rather than covered with plywood. I built a gabled roof on the tank, with the rafter tails secured to the top-plate of the stem wall.
 Taking break from stripping forms
When the job was done (floor and walls), I had used approximately 55 sacks of Portland cement, 6 cubic yards of sand, 10 cubic yards of gravel, and about 400 gallons of water. Not exactly like building Hoover Dam, but it felt like it!
I kept the concrete slab and walls wet while they were curing by spraying everything down with a hose, including myself, as often as possible. Water was handy from a hose I temporarily hooked up to the inlet/outlet pipe in the floor of the empty tank.
Note: When working in hot weather, this spraying procedure should go on for at least a week.
Sealing the tank
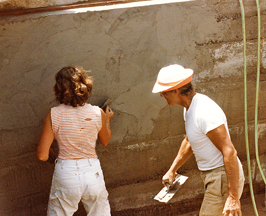 Dorothy & Bill trowel on "Thoroseal"
I think the reason my tank has held up so well for 23 years now, in spite of the 1:3:5 poorman's mix I used, is that I coated the inside of the tank with Thoroseal, a cohesive sealer.
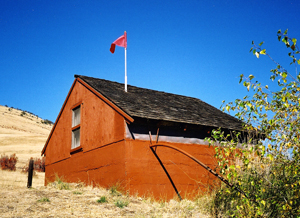
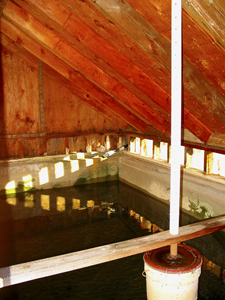 Bucket with flag pole in it sticks through roof, to monitor water level
Thoroseal is a Portland-cement-based coating that, when mixed with a milky-looking catalyst called "Acryl 60," fills and seals voids and waterproofs the concrete. It prevents water from seeping into fissures, where it might freeze, expand, and crack the concrete. It also resists hydostatic pressures (water pushing out) and is non-toxic in potable water tanks. It can be brushed on, but Bill advised me to trowel it on about 1/4" thick for an impenetrable bond. It took a lot of elbow grease applying it in smooth swipes on the entire inside surface of the tank, but it covered up all those rough cold-joint seams and made it look as smooth and beautiful as a baby-elephant's butt.
I don't claim to be an expert on the subject of concrete tank-building. We built the tank during possibly the hottest July in history, so my memory of the details may be a little off due to sunstroke. All I know is that I built it under Bill's tutelage, and it has stood the test of time.
When I look up the hill and see the water-level flag sticking out of the tank's roof and dancing in the breeze, it helps to quench my thirst for security and self-sufficiency.
Back in the summer of 1983, the finished tank with its shingled roof cost me a total of $750 to build, including the lumber and plywood used for the forms.
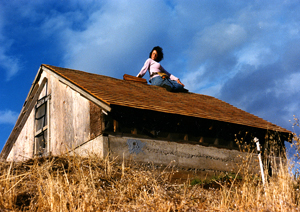 Dorothy roofs the tank
 Completed tank with screened door & vents
Today's average prices
Ingredients to make the concrete:
- 80lb.bag of Portland cement ----------------- $2.50
- Cubic yard of "construction sand" ----------- $15.00
- Cubic yard of crushed gravel ---------------- $10.00 (3/4 minus or pea gravel)
Note: You can buy construction-grade sand and gravel already mixed in the ratio you want at any large rental equipment yard or your local sand and gravel supplier for about $32/cu.yd. or $350 for a 10-cu.yard dump truck full, delivered to your site. That sure beats the way I did it! Having the raw ingredients delivered would have been heaven, instead of that other place!
Framing and roofing lumber:
- 2x8's --------------------------------------- .70/ft.
- 2x6's --------------------------------------- .50/ft.
- 2x4's --------------------------------------- .35/ft.
- 5/8" CDX plywood for roof ------------------ $18/sheet
Roof: I recommend composition roofing (cheap) or metal roofing (fireproof). I used cedar shingles back then, but now I would choose metal roofing and divert the annual rainfall via rain gutters into the tank to supplement the supply.
Total materials it takes for a 6500 gallon tank:
- 55 bags cement: ----------------------------- $140
- 5 yds. sand: -------------------------------- $75
- 10 yds. Gravel: ----------------------------- $100
- 2 yds. Gravel under pad: -------------------- $20
- 40 - 2x4 x12's ------------------------- $168
- 8 - 2x8 x12's -------------------------- $67
- 12 - sheets of 5/8" plywood ------------ $216
- Stem-wall: 12 - 2x4x12's -------------------- $50
- 20 - 2x6x8's ---------------------------- $112
- 12 sheets of 5/8" plywood ----------------- $0
- Assorted screws and nails and drain hardware: about $50
- Thoroseal: 10 - 50lb. bags to cover 500 sq.ft. $250
- Acryl 60: 5 gallons ---------------------- $125
- Composition roofing to cover the 200 sq.ft. roof about $50
- Labor cost = your energy (a renewable resource)
- Strong back = fringe benefit
- Optional cost of labor if you treat yourself to pizza and beer to celebrate when the job is done ------ $20
Forms
Roof
(I recycled the same plywood I used for the forms)
The same tank today adds up to $1,500...still not bad for a permanent 6500-gallon water tank. I say permanent, but now I have my doubts after overhearing an old-timer at the hardware store drawling to another old-timer, "There are two kinds of concrete...concrete that's cracked, and concrete that's gonna crack." Then he slapped his thigh and they both cackled and wheezed.
Closing thoughts
Any able-bodied person can mix and pour concrete. Building the forms to contain and shape it is easy and elementary carpentry. Even though my cavewoman ordeal with concrete might sound difficult, don't be intimidated by the stuff. It's malleable and infallible. My style is to overbuild everything; it needn't be yours. If you have a little extra cash and aren't in a big hurry, working creatively with small batches of concrete mixed in a wheelbarrow can be downright fun!
Conservation tips
When you live on well water and have to pump every drop, here are some astonishing figures to consider:
A running faucet uses 3-5 gallons a minute.
A running faucet while you brush your teeth can use 5 gallons.
A running faucet while you do dishes can use 30 gallons.
Washing machines use 30-60 gallons for each cycle. Wait until you have a full load of clothes before doing the laundry.
A long shower can use 50 gallons if you don't use a flow restrictor. You'll know it was too long when you run out of hot water. You'll know it was way too long when you run out of cold water!
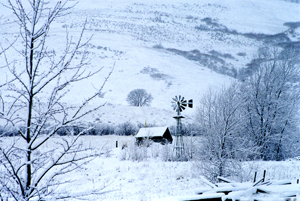 Winter wonderland
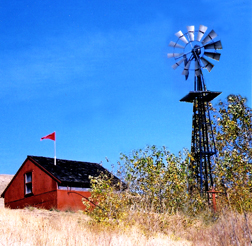 The "Odd Couple"