2009
 Cynthia & Zane
Build A Hybrid Go-Kart For Kids For $150
by Dorothy Ainsworth
Grandma Clara used to delight in telling us the story of our dad's first complete sentence at age two when he received a toy car for Christmas: "It's got gears!" I guess it was the way he said it, with the long, drawn-out emphasis on GEEEEERS that made it so memorable...and laughable.
Little did they know it at the time, but his enthusiastic burst of joy over those little wooden cogs revealed his interest and passion for all things mechanical and that it would manifest itself in creative projects and inventions throughout his life (1914-1994).
He ended up with six kids and worked as an auto mechanic to feed his hungry brood, but that didn't put a damper on his creative side. When he was home he was forever building boats, painting beautiful oil landscapes, and making sure all six of us were happily mobile. Being a mechanical genius of sorts, he prided himself on never having to spend any money to keep us on wheels. (As the sole breadwinner for eight, he didn't have any money.)
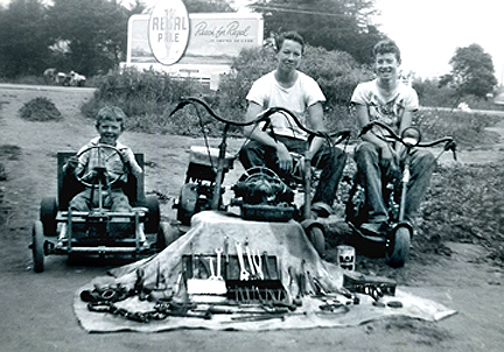 The Ainsworth Brothers in 1950
We enjoyed a poor-man's fleet: doodlebugs (motor-scooters) for the older kids, and go-karts for the younger ones. He built them out of lawnmower engines, drive-chains, and GEEEERS. At age seven, I remember riding my gas-powered doodlebug over to Lota Jean's house to play, and she would try to keep up with me on her fancy bicycle. Mom called her "the poor little rich girl" because she had everything...but a doodlebug. I had nothing...but a doodle bug...and a really cool family.
We all grew up and graduated to cars and motorcycles and had kids of our own, but some of us carried on the family tradition of scrounging for parts and building something from nothing. Even if whatever it was ended up looking like a contraption, at least it worked, and we had fun with it.
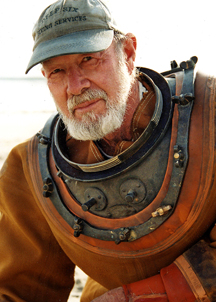 Gene still diving at 73
Photo by niece Cynthia
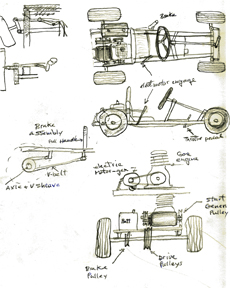 Gene's sketch
My older brother Gene...professional deep sea diver, astronomer (telescope maker), builder, artist, cartoonist, writer, poet, musician, and tinkerer/inventor...added "grandfather" to the list a few years ago.
When his grandson turned five, he decided to build him a go-kart in the low-budget Ainsworth tradition. But not just any old go-kart...a hybrid go-kart! Gene would go green just for the challenge of it. He also wanted the project to be a learning experience for the little guy, so he could see how an engine works, and how the linkage is hooked up to drive the wheels. To give inquisitive kids something to ask questions about, he wanted the parts visible (moving or not).
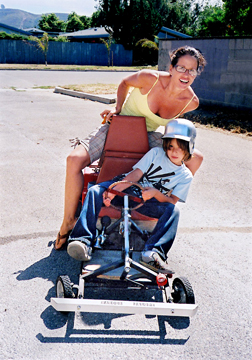
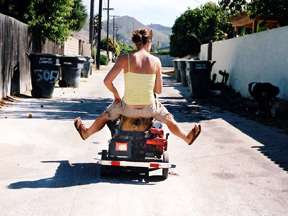 Cynthia on the rumble seat
 Zane 7
When I visited my daughter Cynthia and 7-year-old grandson Zane in Hollywood last summer, we went to visit Uncle Gene just to ride the go-kart. It was great fun and well worth the 100-mile drive. The jalopy runs on a lawn mower engine, but can be switched over to run quietly (and slowly) off the battery if a younger child is intimidated by the sound and speed of the gas engine. Zane tried both and found the gas-powered mode to be as fast as he dared to go.
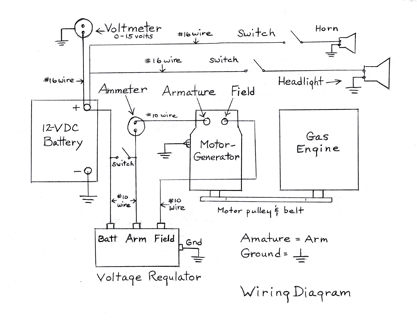
Gene said he'd be happy to share the sketched plans and how-to info with Backwoods Home magazine readers, so in this article, with his help, I'll do my best to basically illustrate how to build this thing. The specs and photos will have to tell the story.
Please note that you will need some degree of mechanical understanding and ability, and some experience and skill in using tools, to construct it. This article is simply the documentation and illustration of a prototype that Gene fashioned out of new and used parts as he went along. It cost only $150.
Feel free to alter the dimensions and make any other changes you want to customize it to fit your needs. If you have money to burn, you can make this go-kart as fancy as you desire. Build a body, a sheet metal cowling and fenders, and add paint and pin-striping, or anything you else you might dream up.
Basic Construction Specs
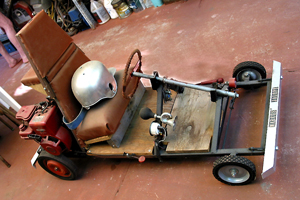
 3/4 view
1. CHASSIS: 1-inch box steel tubing for main chassis and 2-inch channel iron for rear cross member. 5/8" plywood for floorboards. All steel members are welded (best way) but could be bolted together if welder is not available.
2. ENGINE: 2-HP Briggs and Stratton gas engine with centrifugal clutch (lawnmower engine). Not a rotary engine, but the self-propelled type of lawnmower engine. Get any size HP engine you want. Gene wanted a small engine without too much power...for a young child. Common sizes are 3 to 5 HP. You can find 2-HP engines only in older lawnmowers. At top speed it runs at 3600 RPM, but with the 4 to 1 pulley ratio, it runs at 3000 RPM and delivers about 1.5 HP. The pulleys determine the gearing: how fast it takes off and how fast it goes. A 5-to-1 pulley ratio would have a faster top speed.
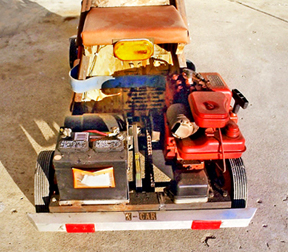 Rear view
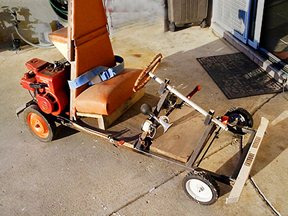
 Side view
3. ELECTRIC DRIVE: Delco-Remy 30-amp, 12-volt DC generator, which acts as a 12-volt DC motor when armature and fields are excited by a battery-supplied 12-volt current (hence "generator/motor"). The generator/motor is limited by the 12-volt battery output so it produces only about 1/2-HP, just enough to give a small child a thrill. If you can make room for it, use a 12-volt DC battery from an electric-start riding lawn mower, or a large motorcycle battery, or a regular car battery.
You might wonder what the difference is between an electric motor and an electric generator. The answer is technically no difference. If you connect a 13-volt generator to a 12-volt car battery, it'll run just like a motor with a slow-turning shaft. Apply mechanical power (hook it up to the gas motor via pulleys and a belt off the shafts) and it works as a generator that recharges the battery because the shaft is now turning fast.
The catch is you have to put a voltage-regulator between the battery and the generator. The regulator has two relays inside it. One relay keeps the generator from over-charging the battery when the shaft is turning fast and the other relay disconnects the battery from the generator when the shaft is turning slowly and starts to drain the battery. Hence the name "regulator." By flipping a switch this hybrid go-kart works in either mode.
 Top view
4. WHEELS: Fronts are 7" dia. ball-bearing type wheels on independent steering axles (1/2" dia. steel rod). Rears are 10" dia. wheels on 3/4" iron-pipe. Both sets have hard-rubber tires, but air tires offer a smoother ride if you have a bumpy road.
5. DIMENSIONS: Approximately 2 feet wide and 4 feet long, but you can make it any size that will accommodate all the parts and accessories to work in unison in a practical compatible design.
6. COMPONENTS:
A. On/off toggle switch for electric motor drive.
B. Voltage regulator for charging battery when in gas engine mode.
C. Voltmeter and ammeters for monitoring battery voltage and charging rate. When I asked Gene why it has a voltmeter and an ammeter, he said the voltmeter shows battery voltage during charge and discharge mode; the ammeter shows rate of discharge during electric motor mode, and rate of charge during gas engine mode. Be sure to get a center-off ammeter.
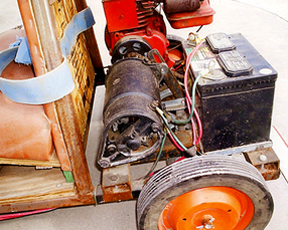
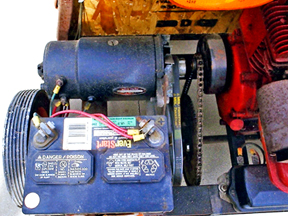 Close-up
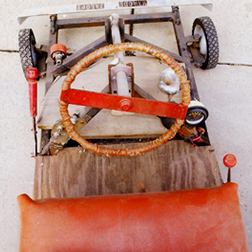 Stearing mechanism
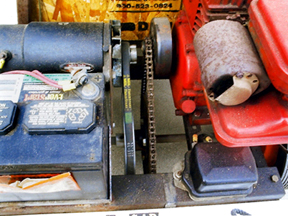 Chain drive
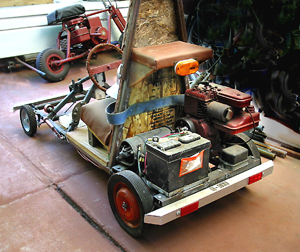 3/4 rear view
D. Chain drive with 4-to-1 sprocket ratio and centrifugal clutch for the gas engine.
E. Electric V-belt drive with 4-to-1 ratio on pulleys for the electric motor/generator and for battery charging.
F. Brake (hand brake) is V-belt drag-type (sheave) on rear axle, activated by cable and pull-bar. A sheave is a pulley with a V-belt loosely around it, with the opposite side fastened to the frame and rear axle. When you pull on a lever or press on a foot pedal, it puts friction on the sheave and acts as a brake.
G. Tie-rod type direct-ratio steering on front independent axles.
H. Spring-loaded aluminum bumpers front and rear made from 2" angle stock.
I. 12-volt DC headlight and switch.
J. Seatbelt, roll-bar, and stepped-up seat on back for adult passenger.
K. Squeeze-bulb air horn, or electric horn with a horn button (easy to wire to the battery). The latter are plentiful at wrecking yards. (Funsies for the kids!)
Construction Sequence
1. Assemble and weld chassis frame.
2. Mount axles, wheels, and steering linkage to shaft and steering wheel.
3. Mount large pulley, sprocket, and brake drag pulley on rear axle pipe.
4. Install gas engine and motor/generator. Align small pulley and sprocket with counterparts on rear axle.
5. Mount voltage regulator gauges and switches. Wire to battery (#10 wire), install headlight and horn (#16 wire). Headlight and horn are optional but look cool to the kids.
6. Weld seat frame and roll bar. Mount seats.
7. Install plywood floorboards.
8. Install bumpers.
9. Ride, Sally, Ride!
Suggested Sources For Materials
1. Engine: Lawnmower repair shop, want-ads for cheap used lawnmowers, or recycling yards at the dump. An ideal bargain would be a discarded riding mower that had not only the engine but the front axle and steering mechanism still intact.
2. Generator/motor: Auto parts store or generator/alternator repair shop, wrecking yard, or recycling yard at the dump.
3. Battery: WalMart, lawnmower shop, automotive dept. in big variety store, or wrecking yards. If you can't find a good used one, buy a new one with a long life you can depend on.
4. Wheels: Ace Hardware or from lawnmowers in recycling yards. For a softer ride, use air tires (tube tires) instead of hard rubber tires. Look for either.
5. Belts and pulleys: Ace Hardware or automotive shops, such as Napa Auto Parts.
6. Chain sprockets and chain: Lawnmower shop or recycling yards.
7. Box tubing and channel iron: Welding supply, but cheaper at scrap-iron yards or iron-and-steel works. (See Yellow Pages.) Ace hardware, Home Depot, and Lowe's have assorted angle iron and aluminum.
8. Plywood: Lumber yard, and other building supply places, such as Home Depot and Lowe's (open weekends).
9. Wire: Napa Auto Parts, Lowe's, Home Depot, and hardware stores. Use #10 copper-stranded wire where indicated on the wiring diagram (including ground wires) and #16 copper-stranded everywhere else. Stranded is easier to work with than solid.
10. Switches: Install a 20-amp switch (somewhere that's handy) between the two wires from the battery terminal and the armature terminal on the voltage regulator. Make sure it's a momentary switch (spring-loaded) so when it's released, it kills the engine instantly. The headlight switch can be a 2-3 amp toggle switch, and the horn a 2-amp button switch.
Scrounge materials anywhere you can think of. With a little luck and ingenuity the go-kart shouldn't cost over $150. Be innovative and see photos for reference.
Buckle up and wear a helmet.
Good luck, and happy motoring!
Technical or design questions? Email me and I'll ask Gene and get back to you as soon as I can.
 Side view
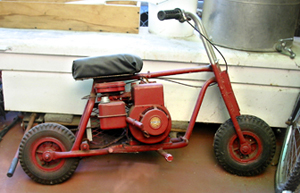 "Doodle-Bug"