September 15, 2017
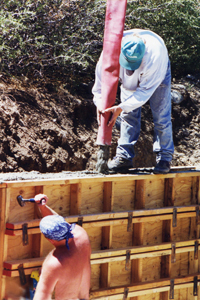
 Walers
BUILD A CONCRETE ROOT CELLAR
(root cellar/bomb shelter/hurricane safe-place)
by Dorothy Ainsworth
I should have been a mole—it feels so safe and cool and quiet to be underground. So when my house burned down 20 years ago and the backhoe man was on site digging new holes for foundation footings, I asked him to dig a 12' x 16' x 8-foot deep hole in the ground so I could build a large fire-resistant root cellar. I planned on using it mainly for storing all my photographs, negatives, CDs, videos, and 70 photo albums—from a lifetime of photography and videography. But it could also be used for a bomb shelter, hurricane safe-place, food-storage room, or anything else a fellow mole might need—customized accordingly.
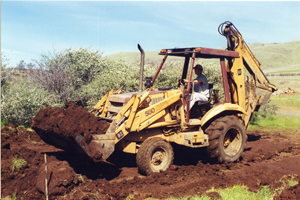 Excavating the hole
In our county we can build a structure under 200 sq. ft. without a permit (but no plumbing & wiring) so I started in researching underground construction. I have a tendency to build everything even sturdier than code would require so I was determined that this cellar would be safe and sound and overbuilt like all my other projects.
I first contemplated using pressure-treated lumber and treated plywood so I could work alone at a snail's pace, but quickly changed my mind to using concrete instead, and got my good-natured boyfriend Kirt involved to help every step of the way. We were a team!
Because we wouldn't have to pay for any manual labor, I researched prices, and estimated that the cost of the dig, plus the materials and concrete, would total about $5000—not bad for a permanent and useful "Room-Without-A-View".
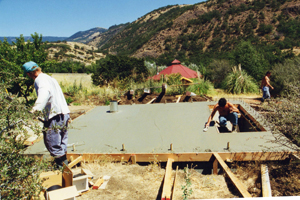
The Floor
 Floor grid
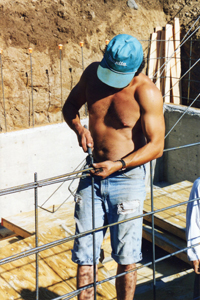 Vadim wiring rebar
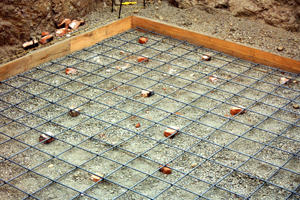
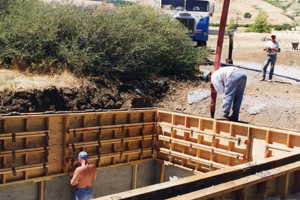
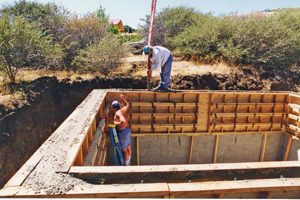
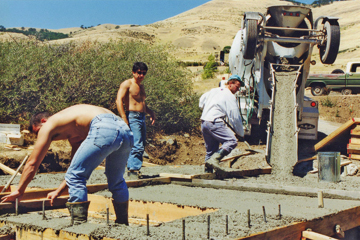
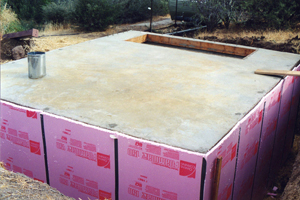
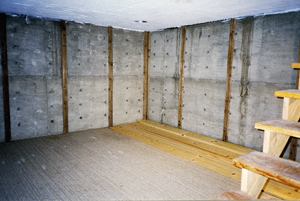
First we leveled the bottom of the hole, laid 6"-8" of gravel down and leveled it again. Then we set up a plumb, level, and square 2" x 8" frame around the perimeter and braced across the corners at 45 degrees, and pounded in spikes to hold the sides from spreading during the eight-inch-thick floor-pour. All around the perimeter on the lower inside of the 2"x 8" frame we fastened 2"x4"s laid flat with rows of holes drilled 16" apart down the middle—to support the 5/8" rebar sticking up inside the wall cavity—yet to be formed—and to keep it spaced in the middle of that cavity. Before forming up the walls we also wired horizontal rebar to the verticals at 16" apart to create a 16" grid inside the walls.
We strategically placed spacers on the gravel (half bricks) to hold the rebar up 2" off the bottom, and laid down a 12" grid of #5 rebar (5/8"). (We rented a manual rebar cutter to cut as needed.) Then we called Ready Mix to come up and do the pour. They recommended fiberglass be added to the mix to help protect against cracking at a later date, so of course I said yes and paid the nominal extra charge.
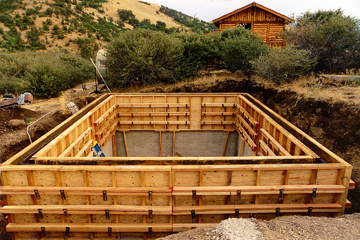
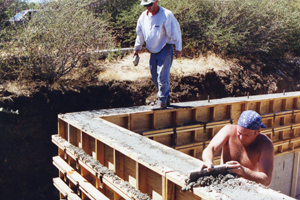
The Forms, Wales, and Snap ties
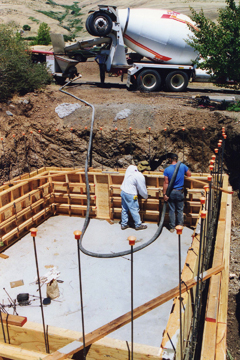
Once the floor was troweled, screeded, and "floated" perfectly level, and had set-up as hard as a rock, we built the wall forms (like pallets) out of 2"x4" studs and 4'x 8' sheets of 3/4" plywood and laid them down lengthwise so each pour would be 4-feet high. There is so much weight and pressure pushing out as the concrete is pumped in, four feet tall is maximum for a pour.
 Snap tie and Wedge
We bolstered up each pair of forms set 8" apart, with double decker 2"x4"s running horizontally—on each side—and held them tightly together with snap ties using cones and metal wedges made just for that purpose. These rows of horizontal members, called "walers", were set only one foot apart to keep the walls from "blowing out" during the pour, and the bottom of the form was doubly braced. The long snap ties are sandwiched between the doubled up 2"x4"s and go all the way through each wall (via holes predrilled in the plywood) and are held firmly in place by cones or washers and metal wedges on each side—every 18"-22" along the walers. (The snap ties have button ends that fit into keyhole slots on the metal wedges.)
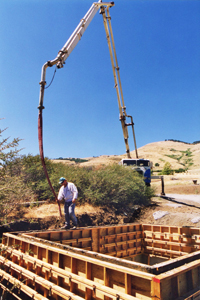 Kirt w-pump hose
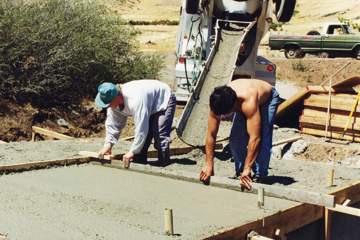
 Long pump hose
 Kirt and concrete pump hose
 Kirt pouring, Eric tamping
 Kirt pouring, Eric tamping
After the first 4-foot pour, we methodically moved the forms up and called for the second pour, to bring the walls up to eight feet. (The forms came off easily because we had sprayed them lightly with Thompson's Water Seal aforehand.) Then we snapped off all the protruding snap ties left sticking out of the exposed concrete walls, by twisting them off using a piece of small diameter pipe long enough for good leverage.
Before the second pour, we stuck a 2" PVC pipe through the wall as a conduit for a power cord later.
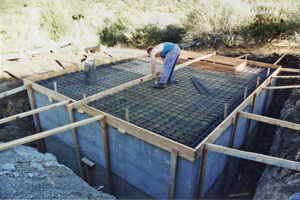
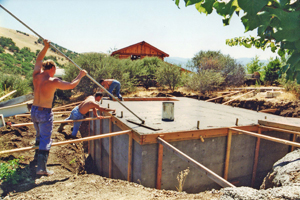
Floating Roof
After the second pour, we screeded the top 8-inch wide perimeter all around and poked in rebar every 3 feet or so for roof anchor bolts. Then we put a 1.5" dia. piece of pipe over each 5/8" rebar stub to create some wiggle-room for the roof to move a little if it ever needed to, such as from an earthquake or just normal expansion and contraction from heat and cold.
 Kirt & Eric screeding wall
 Eric screeding wall
Our objective was to enable the roof to "float" independently on top of the walls. To prevent it from adhering to the walls during the pour we laid down an eight-inch-wide strip of tarpaper (30# felt) on top of the walls all around the perimeter.
Note: An old retired water-tank builder from bygone days advised us to do this to prevent the "lid" from ever cracking. An ingenious trick of the trade!
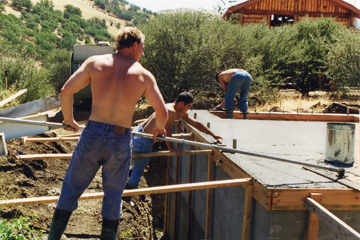
 Kirt bracing roof framing
All went exceedingly well. We built the frame for the roof, and also framed in the opening for the stairs, and braced everything securely to prevent backpressure from bulging the frame out. We laid down plywood which was supported underneath by heavy duty scaffolding with adjustable casters cranked up firmly against it. To make the unsupported roof design extra strong, we installed a tight 6" grid of rebar held up off the plywood by rebar chairs this time (professional spacers more accurate than half bricks). I cut a 12" hole in the plywood and put in a 12" dia. wind turbine over to the side opposite the stair opening—for future air circulation—and then called for the 8-inch thick roof-pour.
 Chute work
 Kirt & Vadim screeding roof
We spent quite a while screeding and troweling the final pour and finishing the surface with a "bull float" as perfectly as we could. Son Eric and friend Vadim rushed over to help; it was hot, and we had to hurry with the fine-finish work.
 Finishing roof
 Floating & troweling
 Kirt using bull float
When the roof was hard but still "green", we pulled the short pipes off the rebar sticking up, then cut the stubs flush with a Sawzall, and caulked them with silicon to prevent rust.
After the roof finally set up and cured for a long time while being supported by the scaffolding, we figured it was strong enough to park a car on!
Backfilling and Drainage
When all was done we sprayed the outside of the walls with a masonry waterproofing sealer, and protected them further with 1" rigid foam insulation, then called the gravel-shooter guy to come up and fill in the sides with gravel. The company is called CAD (Conveyor Aggregate Delivery) and they do a great job of completely back filling around a structure by accurately shooting the gravel from a distance, monitoring it by remote control. I don't remember what the charge was but I DO remember it was worth every penny!
 Rigid foam protection
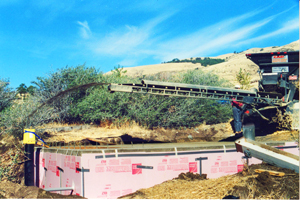 Gravel-shooter
Before CAD arrived I put a 10-foot x 12" dia. black corrugated drainage pipe vertically down the wall on the lower side of the hill so if water ever accumulated we could lower a little sump pump 8 ft. down the hole and pump it out. In the past 20 years I have never had to do that. This particular root cellar has no drainage provisions except for a 4" dia. perforated/corrugated French drain on the upper side of the cellar. It's buried 12" and laid down in a big arc so it daylights on each side beyond the cellar. If it ever floods, I'll dig a deeper tench.
I guess we lucked out with the location. Most root cellars are dug into a hill so one side is at ground level with a door in it, not dug straight down on all sides like a basement. A builder has to take flooding into serious consideration and plan for drainage. I took a chance on this dry location, and figured if all else failed we could use it as an indoor swimming pool!
Finishing Touches
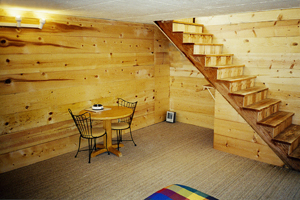
I built the 12-foot long stair horses and 4-ft.wide stair treads from 2" x12"s and installed them at a comfortable angle of "rise and run" (8" in 11"). We dismantled the scaffolding and hauled it up the stairs and out.
 Entrance cover
 Entrance to stairwell
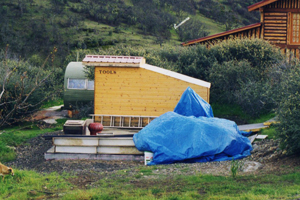
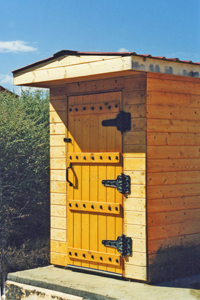
Next, Kirt built a cute "little house" over the stairwell to match the other structures on the property, and put white translucent polycarbonate panels on the shed-part of its roof to let light in. I made the board and batten "hobbit" door for it, then carried on with trying to beautify the inside of the place. I lined the interior walls and ceiling with 1"x12" small-knot pine boards run horizontally. I had to rent a concrete nail gun that used .22 caliber bullets to fasten the 2"x4" vertical furring strips to the concrete. (Earplugs mandatory!) Then I attached the beautiful boards with nice looking screws, and snapped a few pictures. Once it got filled up I knew it would never look this clean and spacious again. I installed glue-down carpet, and temporarily moved a bed and a table and chairs into it for sipping coffee or taking a nap, but that fantasy was short-lived.
 Furring strips
 Pine walls in cellar
Costs and Calculations
The completed root cellar took approximately 21 cu.yds. of concrete, and 2 months to complete. I had to pay an extra pumping fee for the narrow walls because the barrel rig had to use a pump hose, but for the floor and roof they used a chute.
To calculate how many cubic yards of concrete you'll need: multiply length in feet x width in feet x thickness in a fraction of a foot, and divide by 27 (27 cu.ft.=1 cu.yd.).
Nationwide, the average cost of concrete is now about $100/cu.yd. Twenty years ago it was $85 so it hasn't gone up much at all. It's still affordable! All told, the project did indeed cost $5,000 (concrete $2000) and is a great addition to the property. I can escape down there when it's either searing hot or freezing cold outside, and the temperature is between 50 and 70 degrees year round. Moles have it made!!
Disclaimer
This article recounts how I built my underground room, not necessarily how you should build yours. The location and the construction details of an underground structure depend on the climate, rainfall, soil, water-table, tree roots nearby, and drainage. There are many considerations before beginning a project like this. Do your research and consult local rules and regulations. There are great websites (and books) that instruct and illustrate exactly how to build and set concrete forms. Happy burrowing!
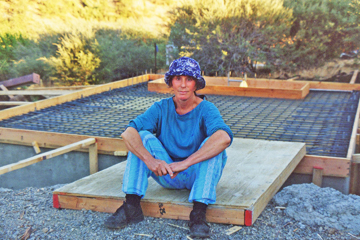 Dorothy takes a break