2008
 Eric 44 in 2007
BUILDING ERIC'S HOUSE
by Dorothy Ainsworth
ATTENTION READERS: This is the first in a series of several articles documenting the building of a stud-frame house from start to finish by an amateur owner/builder, using the pay-as-you-go and learn-as-you-go process.
Introduction
"Gimme some land and some sticks and stones, and I'll go out and build me a home." This primitive poem written in 2008 AD by DA...a female log-cabin dweller...sums up a strong basic human desire rooted in our biology.
If given half a chance, most young men (and many women) would love to design and build their own home. Recently I was able to re-zone my property and give my own son Eric that half a chance (a house site on my 10 acres). He went for it blocks, mortar, and wood!
About The Builder
 Eric tuning pianos at music store
 Eric at 27
Eric, by trade, is a classical pianist, composer, piano tuner/technician, and recording engineer. He has been busy constructing baroque fugues instead of houses. But because his parents are both builders, he has absorbed considerable knowledge and experience by helping out over the years. Now it's his turn to do it his way, and to try to keep all ten fingers while he's at it!
Encouragement

 Eric rebuilding a concert grand
Almost any adept do-it-yourselfer can learn to use the tools and follow the rules it takes to build a house. In spite of all the new technology, old adages still apply when doing the work yourself: Plan Ahead; Safety First; Measure Twice, Cut Once; Plumb, Level and Square, and Practice Makes Perfect.
Anybody can learn to hammer a nail and apply the basic laws of physics to a building project, but common sense is mandatory: Gravity rules; if you are careless on a ladder, you'll end up on the ground. Rust never sleeps; if you don't put your tools away, and it rains, you'll end up with iron oxide. If you don't make sure everything is plumb, level, and square as you go along, your house will be a three-dimensional parallelogram or trapezoid. But construction techniques are simple and straightforward. A house is not a spaceship.
You can actually build a house from reading how-to books. Every step of the process is written about and illustrated in great detail by experts in the building trades. The Unified Building Code is explicit and can be referred to when you have a specific question about what is required in your county. There are no mysteries...all the information you will need to succeed is readily available.
So why wait? If you have an approved home site (meaning septic and zoning approval), get started! You'll save a ton of money by doing the labor yourself. I estimate from my own experience that 65-75% of the cost of a conventional house is labor. Eric figures he can build his 2000 sq/ft stud-frame house for $30/sq.ft.
Plans and Permits
 Eric 2006
 Eric staking out his site
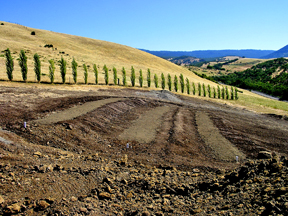
Eric's first step was to draw up his house plans, which included a site plan showing where his house would be in relation to all the other buildings on our 10 acres. Then he paid for a site review from the county. They determined his house had to be 100 feet from the property line, so he picked a nice spot and staked out the perimeter to get the south-facing orientation he wanted for solar efficiency and the best view. He wanted the kitchen on the east side to catch the first rays of sun in the morning, the entrance on the west where the road comes up, and the bedroom on the cooler north side. The well and the electricity were already available, so he was in luck, not having to spend about $10,000 for those two necessities. The site was approved, and he was ready to proceed.
Eric and I made a deal. I would pay for the building permit and provide the septic system if he would build the house itself and pay for it as he went along. The land is in my living trust, so his building of a house increases the value of the property for us all (myself, Eric, and my daughter Cynthia). It's a family affair, and I advocate families sticking together and helping each other now that the median price of a modest house is over $200,000.
 Septic beds
 Septic tank
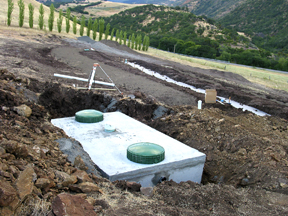
Now the ball was in my court to install a septic system. I got busy and hired a septic consultant to draw up the plans to present to the county for an ETA system (evaporation/transpiration/absorption) based upon the size of the house and the soil conditions. Usually the county here mandates a sand-filter system because of the heavy clay soil, but we wanted a gravity-drain ETA system that wouldn't require the electric pump that a sand-filter does. I persevered, jumped through a few hoops, finally got an approved variance, and had the system installed for $10,000. When that was done, Eric went back to the county planning commission and turned in his hand-drawn plans for final scrutiny. They were approved and he got his basic building permit.
 Digging basement
Preparation and Foundation
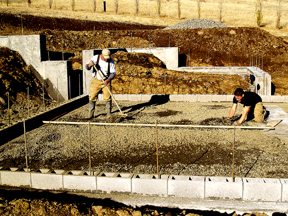
He wasted no time having the basement scooped out of his sloping rocky site with heavy equipment, and the house pad leveled for his basement floor. Then the foundation contractor took over. His crew built forms, installed rebar, and poured the footings. Before they could pour the slab floor, Eric had to put one course of blocks all around the perimeter to contain the concrete. Next day the contractor had a gravel-shooter truck come up and shoot a layer of gravel on the pad area. Then the crew installed a grid of rebar under the floor-to-be and the concrete slab was poured and finished off...to the tune of another $10,000. That wiped out his savings.
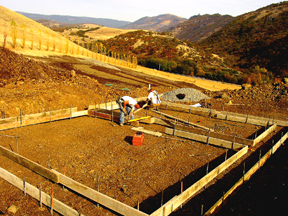 Pad level & forms set
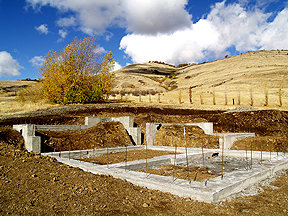 Foundation poured
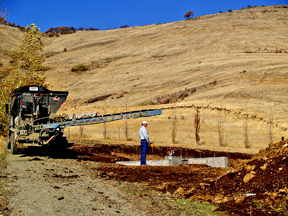 Gravel-shooter
 Leveling gravel under floor to be poured
Basement Block Walls
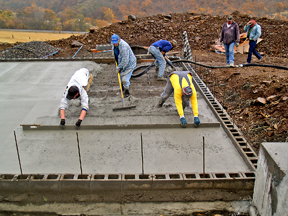 Screeding wet concrete floor
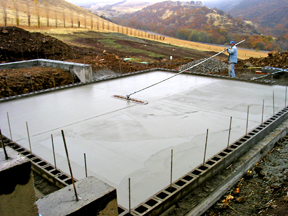 Floor poured & finished off
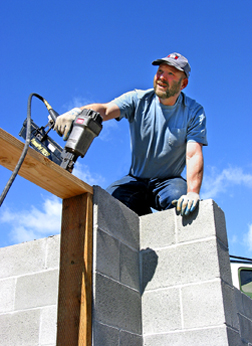
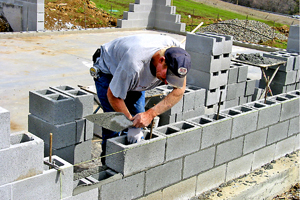
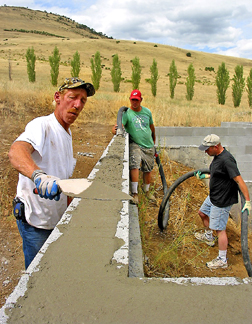
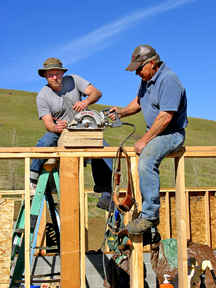
Over the next few months Eric paid as he could to have a journeyman mason come up intermittently and lay the stepped basement walls in concrete blocks, so the foundation of his house would end up plumb, level, and square...guaranteed. He tried his own hand at laying a few blocks but didn't want to take the time to learn that specialized skill when he could be making money by working at his own profession and pay to have the block walls done.
 Setting blocks
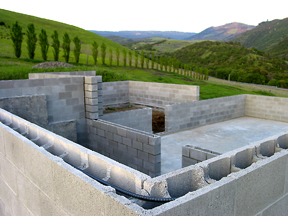 Foundation block-walls complete
For Eric, it was a wise decision. Professionally done masonry is not only a skill, but an art. Eric's mason (Ron Latour) dazzled us with his poetry in motion flair as he made hard labor look easy. Each 8"x8"x16" block weighs about 35 lbs., and he laid 700 of them!
A rough estimate of the cost of the block walls was $5.00 a block, which included the block, mortar, and labor. Eric kept the cost down by hauling the blocks and mortar himself and having everything ready for the mason when he came up. If the mason does it all, as in a commercial job in this area, it's about $8/block.
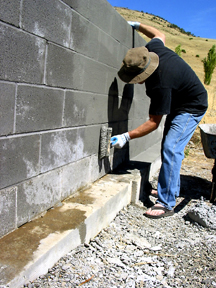 Eric applies "Thoroseal" to bond & seal blocks
Note: If you are so inclined and have more time than money, you can do the block work yourself for only about $2.00 a block. It is doable, and you could save a bundle!
As soon as the basement walls were completed, Eric waterproofed his walls by brushing on a layer of "Thoroseal" mixed with a bonding agent called Acryl-60. Then he installed foundation drain lines and rigid-foam insulation and had the walls backfilled with a combo of dirt and decomposed granite.
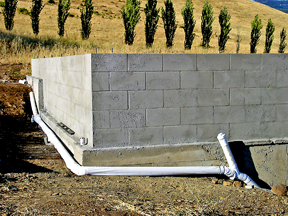 Foundation drain lines
His house site was on a rocky outcropping. The excavators could not dig any deeper than they were able, without blasting, so Eric opted for backfilling. The cost of the drain pipes and insulation came to about $500, and the fill dirt cost $1,000.
Electrical Service
 Ron wires service panel
Eric's dad, Ron Smalley, a general contractor in California, came up last fall (2007) to help him wire in a temporary electrical box at the building site. The total cost of the box, wire, conduit, and outlets came to about $300. Now Eric was in business...he could use power tools to build with and have classical music to work to. Things were lookin' up!
Electrical note: When the foundation crew installed all the 1/2" rebar, they also attached a vertical length of it to the horizontal rebar in the footings. This vertical piece acts as a whole-house grounding rod for the electrical panel. Ron connected a #4 copper ground wire from this rebar to the electrical box. If this step isn't done prior to your foundation pour, you'll have to pound an 8-foot, copper-clad ground-rod down into the earth near your foundation. You'll need a sledge hammer or a rented ground-rod driver. Not fun.
PROGRESS OVERVIEW:
 Eric's 10 fingers still there
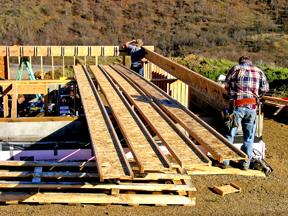
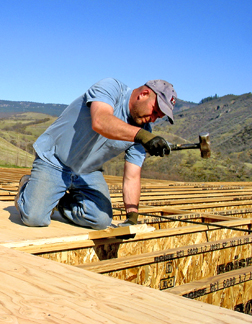
Eric worked all winter and saved enough money to buy the materials for the basement framing ($3600). The load was delivered March 3rd and his dad came up again from California to help with the 2"x6" stud-framed pony walls, BCI floor joists, and 1 1/8" T&G plywood floor. It was very important that this step in the construction was also done right. A plumb, level, and square wood foundation on top of the plumb, level, and square masonry foundation determined how geometrically perfect his house would be from here on up. I got in the act too, laying down beads of glue on the joists with a caulking gun before each of the 46 sheets of plywood were nailed down using a nail gun. We were armed and dangerous!
The whole experience was a dream come true for a 40-ish young man who could now see the three-dimensional results of his investment. He marveled at his good fortune in having help from his mom and his dad. He passed his underfloor structural inspection with flying colors. We celebrated with hi-fives to each other, and yep, we all still had ten fingers!
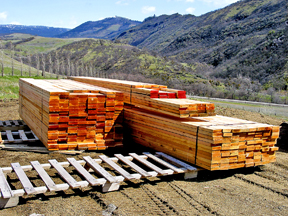 Framing lumber
Now Eric is on his own (until he needs help erecting his 5"x18"x30-foot ridgebeam). He ordered his wall-framing lumber when prices were down, just hours before they started to creep up. The 2"x6"'s were at an all-time low of 28 cents a lineal foot in the winter of 2008. He had 3700 lineal feet of 2"x6"'s delivered for only $1040. March 21st was a beautiful day to remember: Bach's birthday, the second day of spring, and a huge pile of lumber delivered that would keep him busy framing for the next three months of spring. As soon as his walls are complete, he'll order his ridgebeam and rafters, and we'll help him put the roof on his house during the summer months.
Please note: Build now! Chances are that lumber prices will remain fairly low during the economic squeeze we seem to be in.
No sooner had the lumber been delivered than rain was ominous. We hurriedly caulked the plywood seams and painted the floor with 10 gallons of exterior reject paint from the hardware store. (He bought it cheap ($3/gallon) and mixed all the cans together.) We covered the floor and the new lumber with huge tarps tied down to weather the spring storms that were forecast to roll in one after the other. The covered basement is a safe and dry place for all his tools.
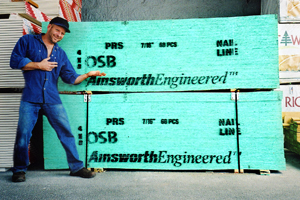 "Ainsworth Engineered" OSB for sheathing the house
Eric's next step is to lay out his wall framing by snapping chalk lines on the painted floor...lines that correlate exactly to his floor plan on paper...and then build his walls. He'll build the stud-frame walls on the floor from 2"x6" lumber, sheath them with 4'x 8' x 5/8" OSB while they are still down to keep them square, and raise them into place one at a time with help, or by himself with wall jacks. Note: 5/8" Oriented-strand-board (OSB) is about $10/sheet and is commonly used now instead of plywood, and is code approved.
Eric's south-facing 2000 sq.ft. house-to-be is 42'x 24', with an 18'x 16' bedroom wing off the north side, and a 3O'x 24' basement. He figures he can build it for $60,000 (maybe less) over a four-year period, and it's already 1/3 done.
Here's how we did the actual work and a few tips and techniques I can pass along:
How To Build Pony Walls
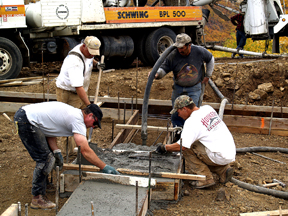
 Eric holds concrete pumping hose
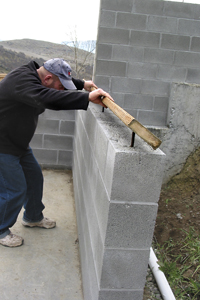
First of all, the pony walls wouldn't have been necessary if Eric had wanted the mason to build the block walls eight feet high to begin with. He decided against that because there was a catch: Code dictates that you can fill the voids in a block wall only four-feet high or less in one pour. Too much concrete weight and pressure can blow out an 8-foot wall of empty blocks being filled. Not only that, trapped air may keep some of the long vertical voids from filling at all.
The concrete had to be pumped in via a hose which required a concrete truck and a separate pumping truck and two crews to work together during the pour (both paid separately). So Eric had the mason do stepped walls on this hilly site, with no wall higher than four-feet, so he'd have to pay for all that pumping equipment only once.
So to get all the basement walls up to eight feet, he built up the differences in height with pony walls. Pony walls have advantages though: They are made from wood-framing (less expensive), they accommodate electrical wiring and outlets, and you can easily frame in windows which allow light and ventilation into the basement.
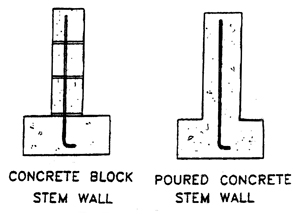
Please note: If you aren't planning a basement with a slab floor, you can simply have footings and stem-walls poured and start your 8-foot walls from that level, using the same techniques as building the pony walls. However, you will have to provide a crawl space for plumbing under your house. The floor joists will have to be a certain distance from the dirt, and you will have to put a vapor barrier put down first (i.e., six-millimeter polyethylene plastic sheeting). Ask your county building dept. what clearance is required. Your stem-wall/footing combination may be formed up and poured at the same time (monolithic-style) or to provide this under-floor clearance, you can build a short block wall on top of your footings later. (See illustration of both options.) As long as you put in the vertical rebar in advance to tie the block stem-walls to the footings, you'll be fine. Keep in mind that every weight-bearing wall in your house has to have support under it...not just the perimeter.
 Filling & leveling the blocks to receive J-bolts
Sill Plates and Anchor Bolts
Pressure-treated 2"x6"'s are required wherever the bottom horizontal plates of a wall (called sill plates) come in contact with concrete footings, stem-walls, or blocks. Concrete can hold moisture and rot regular untreated wood over time. When stem walls or piers are poured, or concrete blocks are filled, and before the concrete sets up, a 1/2" dia. x 12' long J-bolt is inserted into the concrete every 3 to 6 feet (not more than 6' apart for a one-story house, or four feet apart for a two-story house). They should be set in about 3" from the outside edge of the wall-to-be, sticking up about 2 1/2" and as plumb as possible.
 J-bolt (left) & installed J-bolt holds down sill plate
This threaded part sticking up will be accepting the sill plate, which will be drilled with holes wherever there's a J-bolt and fastened down securely with big square washers and nuts. If a J-bolt is not plumb, but the concrete is hardened, screw a nut onto the first few threads to protect it and whack it straight with a hammer.
Please note: If you need to install a few more J-bolts here and there after the fact, just drill the holes with a 1/2" dia. concrete drill bit, and pound in 7"-10" long, 1/2" dia. concrete anchor bolts made for that purpose. Code requires an anchor bolt no more than 12" from the end of any sill plate. It's hard to judge where the ends will be when you are initially setting your J-bolts into the wet concrete, but adding more as needed is not as tough as it sounds.
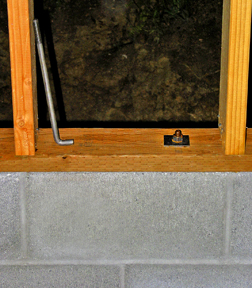
The building code now requires special earthquake and tornado protection in the form of stabilizing brackets called hold-downs on short walls near doorways. The specialized anchor bolts to secure those brackets have to be wired in place before the pour so the inspector can see them before the pour. (See photo of installed bracket.) Please note: These brackets are not to be confused with hurricane ties for rafters.
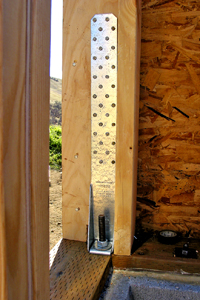 Hold-down for earthquake & wind protection
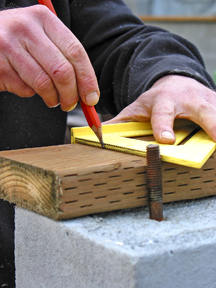 Eric marks J-bolt holes on pressure treated sill plate
Marking the holes to be drilled in your sill plate is simple. Lay your pre-cut-to-length sill plate on the top of the concrete wall, line up the edge parallel with the wall, and using a combination square against the edge and the bolt, mark 2 lines, one on each side of the bolt. Then measure in from the outside edge of the plate to the bolt and make a mark. That mark will be where you put the inside edge of your 5/8" drill bit and drill the hole. Do this all along your sill plate. When you put the plate over the bolts, they should go right in the holes. If you drill a 5/8' hole for a 1/2" bolt, there's a little wiggle room for adjustment.
 Installing sill plate over J-bolts
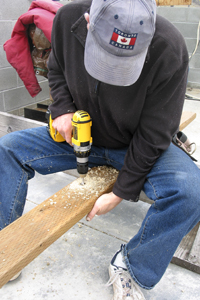 Drilling J-bolt holes
Laying Out The Walls
After all the sill plates are tried on for accurate hole placement, pull them back off and cut your first top plates exactly the same lengths as the sill plates for each wall. Lay each pair down side by side, with the ends exactly lined up (flush). Mark a line on both boards at the same time with your carpenter's square at 15 1/4" increments, and mark an X beside the line. If you are measuring from left to right, mark to the right of the line, but the opposite if you are measuring from right to left. (See illustration.)
Your vertical studs will be spaced 16" apart on-center (OC), meaning the 16" mark will be in the center of the 1 1/2" thick stud. That's why you deduct 3/4" off 16" and mark your guide lines at 15 1/4" and put X's past those lines (meaning ahead of the lines)...for proper placement of your studs. If you made your line at 16 inches, it would be covered up by the stud, so the line at 15 1/4" and the X to the side of it tell you exactly where to put the stud. Double-check your four-foot and 8-foot measurements to make sure the edges of your 4'x 8' sheathing panels will indeed come together perfectly in the middle of a stud, so the panels can be securely fastened down.
When all your sill plates and top plates are marked, measure and cut the vertical studs to length after deducting the 1.5" sill-plate and the 3" double top-plate thicknesses (a total of 4.5" if you are using standard lumber).
Build your wall frames on the floor with 16d nails. Lift them onto the concrete wall and place them over the protruding J-bolts, then fasten the bottom-plate of the frame down with the aforementioned washers and nuts.
If you are working by yourself, you can fasten the bottom plate first, then toenail a stud onto each end of it, then run the top-plate across the span and nail it to both studs as well. Then toenail all the rest of the studs, plumbing them as you go. Working as a team, Ron and Eric used this method because it was so quick and easy.
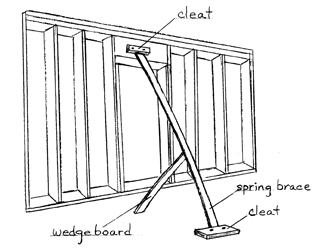 Wall brace
It's a good idea to temporarily cross-brace the framed walls with 1"x4"s or metal strapping to keep them square. The braces can be fastened either before or after the walls are raised. If a wall is bowed out, you can use a spring-brace to force it into plumb.(see illustration)
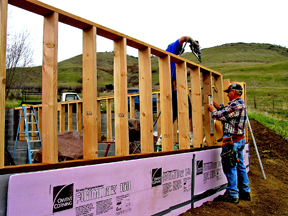
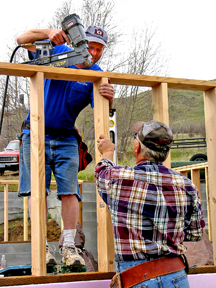 Eric & Ron building pony walls
Please note: Be sure to apply a zig-zagged bead of heavy-duty construction adhesive on top of the concrete wall before placing the stud-frame wall on it. In case of an earthquake, tornado, or hurricane, the glue will help the J-bolts do their job in keeping your house from sliding off its foundation.
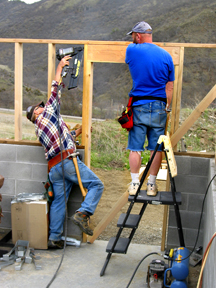
 Team work
If you don't want to mess with glue, and you don't worry about earthquakes, you might want to use sill seal under the sill plates for energy efficiency. Sill seal is a thin, closed-cell polyethylene gasket that comes in rolls of various widths for ease in installation. It will fill the slightly irregular gaps between the concrete and the sill plate. Eric chose to glue down his sill plates "cause there will be a lot of "shakin' goin' on" when he plays Beethoven on the 9-foot grand!
When all the walls are properly aligned, put the second top-plate on, and overlap the corners alternately to tie the walls together. Eric and Ron used a spring-brace twice, a come-along once, and another method of persuasion (small sledge), to coax the walls into perfect alignment, as they permanently secured one wall to another.
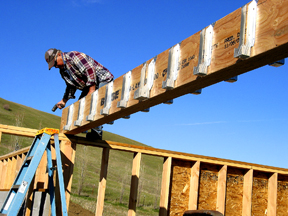
Near-perfect framing ensured that the BCI floor joists were level across the tops of the basement walls and lined up squarely in a row at the other end. The ends were then capped off with a true-1" by 12" plywood board on edge all around the perimeter called a versa-rim.
Installing Floor Joists and Rim Joists
 Ron installing rim joist to cap rafter ends
 Eric & Ron install floor joists
If instead of BCI joists you use standard 2"x12"'s, your rim joists will also be 2"x12"'s (11.5" wide). To determine the joist lengths, deduct the thickness of the rim joists that will be nailed across the ends. In Eric's case, he cut the joists 2" short to accommodate a true 1" rim joist across each end. If you use standard 2"x12"'s, cut 3" off because standard rim-joists are 1 1/2" thick.
Eric chose BCI joists (they look like a capital I)) because they are factory engineered (sized) to accommodate any span you need and have a wider surface (called a rail) to nail your flooring or roofing to. They stay straight (no crowns or dips), and are claimed to ensure a squeak-free floor, because, unlike regular lumber, they don't shrink after they're installed.
Dimensional lumber is strong and nice to work if it's straight, clear, and kiln dried, but not if it's bowed, cupped, twisted, green and wet, or full of knots. Eric is using green lumber for his wall framing, however, because it's cheaper, it's DF (Douglas fir graded #2-and-better) and allowed by code. He'll keep it stickered and covered until immediately before its use, and he'll work with it by using methods of forceful persuasion whenever he has to. Slight shrinkage in the width of vertical wall studs is not as critical as horizontal floor joists shrinking away from their resting spot in the joist hanger seat (squeak, squeak). There are methods to fix that problem, but prevention is best!
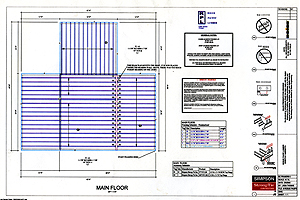 Engineered floor plan to determine sizes and numbers of BCI's required for the spans
Important tip: The lumber yard we buy from (and most lumber companies) helped us determine what size beam we needed to free-span the basement ceiling and what size of ridge-beam to use for the roof. The company they ordered our BCI joists and Versa-Beams from has a computer program that prints the engineered-data sheet you can use to show the county when you submit your plans. The sheet illustrates your floor and roof layout and lists how many joists and brackets to order. It's a great service!
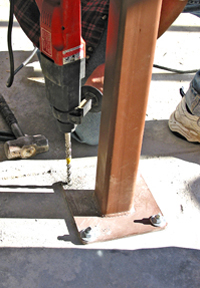 Metal post bolted to floor supports beam in the middle
 Extra thick footing to support middle of beam spanning basement
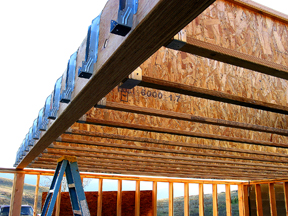
Eric's plans called for a 6"x12" x 24-foot Versa-Beam to span his basement ceiling (the basement ceiling is also the house floor). The beam was to be supported in the middle with an upright post bolted to the slab floor. The floor was poured with an extra thick footing to take the weight. He had a local welder make a steel post out of square tubing ($100).
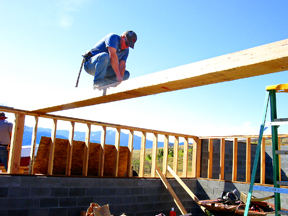
 Ron marks beam where joist hangers will go
 Eric nails on joist hangers
 Trimming beam end
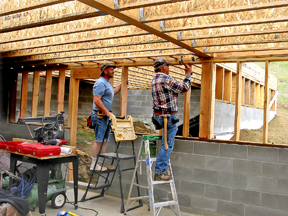
But before the Versa-Beam was secured in place, they laid it on its side across the span. Next Ron marked it along its length 16" on-center, where the BCI joist hangers would be fastened. Then Eric nailed them onto both sides of the beam with special joist hanger nails (thick 1.5"-long Teco nails that fill the bracket holes snugly).
 Ron nails on joist hangers
 Half the joists installed
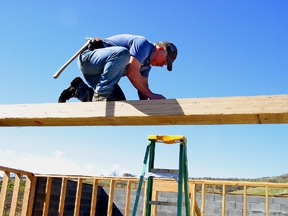
Next they turned the Versa-Beam upright and placed it exactly where it belonged, secured the post underneath, and fastened its base to the concrete floor with concrete anchor bolts.
 Ron & Eric install joists
 Eric seats joist into hanger
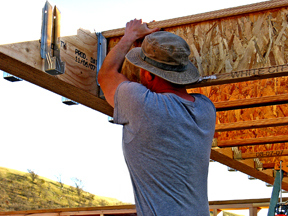
Then, one at a time, they put the BCI joists on. Eric put a bead of construction adhesive in each joist hanger bracket as he went along and nailed the joists to the hangers with more Teco nails.
 Eric installs blocking
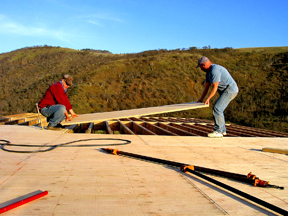
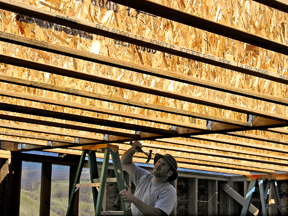 All joists installed
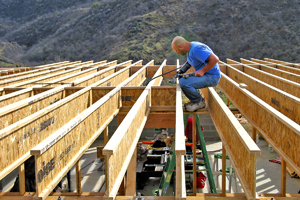
When that was done, Eric put rows of BCI blocking between the joists in the long free-spans to stabilize them and keep them evenly apart so the sheets of plywood would meet squarely at the center of each joist. (See code book for required blocking.) While Eric was doing the blocking, Ron nailed the Versa-Rims all around the perimeter of the house.
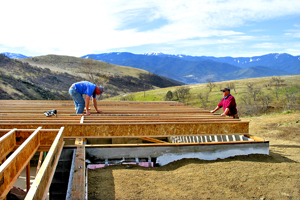
Installing the Plywood Floor
 YAY!
YAY!
 Dorothy lays down a bead of glue to secure plywood to joists
Everything turned out beautifully level and square and ready for the plywood flooring. Eric chose 1 1/8" T&G plywood for his subfloor so it would support his 9-foot grand piano...with no deflection. Luckily, the cost of plywood was down to $30/sheet...a bargain for thick tongue-and-groove (T&G) premium plywood. Just a year before, I had purchased merely 3/4" plywood for shelving, and it was $35/sheet!
 View inside basement
 Eric coaxes T&G plywood seams to fit tightly together
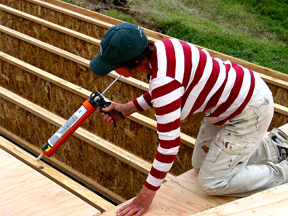
As a team we put the sheets of plywood on, staggering the joints, and glued them down to the joists. Staggering the joints means if you start the first row with a with a full sheet, start the second row with a half sheet. We used bar-clamps when the plywood tongue was reluctant to go into the groove, and sometimes had to whack the leading edge with a 5-lb. hammer (single-jack). Of course Eric used a protective T&G scrap placed on the edge to take the brunt of the pounding. The guys nailed the plywood down with the nail gun and 8d gripper nails at 6" spacing around the edges and at 12" in the field (everywhere else).
 Laying down the plywood floor
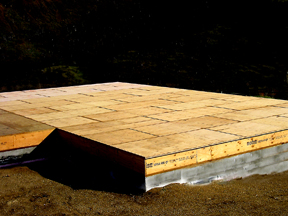 Finished floor
Nails are required by code because they bend under stress instead of snapping as a brittle screw might. Screws have great holding power but very little shear strength, so nails must be used for all structural framing. Using an air-powered nail gun is so much faster than hammering by hand or driving screws that it's like the difference between a loading a flintlock rifle and using a machine gun. When time is money, it's the only way to go.
The drawback is that it's harder to correct a mistake; you can't just unscrew your work. But you can use a Sawzall to cut the errant nail off, and you can use screws when there won't be any shear forces on the structure (interior sheetrock, etc.). For general framing we used 16d vinyl-coated nails (sinkers). The building code specifies what size nail to use for each job, and the required spacing around the perimeter and in the field.
In the code book, you can find that information under the heading: "Nailing Schedule."
Summary and Costs
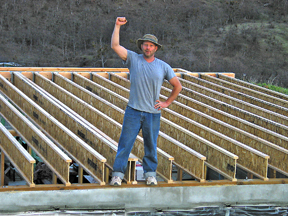
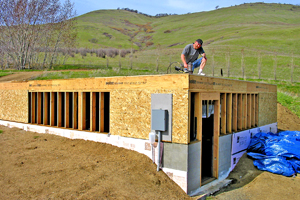 Eric perches atop the finished basement framing
The entire pony wall and floor installation process took us a week and cost about $3,800 for materials (including nails and hardware). So far Eric has invested approximately $25,000 in his house, and that includes his wall framing...already paid for and sitting there waiting to be used. He estimates that his ridgebeam, rafters, all-around sheathing (walls and roof), and Tyvek wrap or paint (to weather-proof the house for winter), will come to another $5,000. Without a basement his house would cost $50,000 to build ($25/sq.ft.) The extra excavation, slab, block laying, pony walls, drainage, insulation, and backfilling added about $10,000 to his total.
Closing Thoughts
If you already have your land, and your utilities and septic are in, you too can build a very nice house for $40,000 or less.
There is no need to go into debt for $200,000 or more to have a home! If you don't have any of the above, I advise you to spend your money for the piece of property you are in love with (location, location, location), then build your house using the pay-as-you-go method.
I bought my 10 acres for $40,000 in 1981 and have built all my unconventional log structures for only $15/sq.ft. by doing the labor myself, but it was slow-going. Eric didn't want to build with logs, but if you think you might, check out the rest of my website and see how I did it.
It's not feasible for me to pay someone $25-$75 an hour for labor when I only make $9/hr. as a prep cook. I took the dirt road instead of the freeway, and Eric is doing the same...and enjoying the scenery while he's at it. We highly recommend it!
Disclaimer: We're not experts, and we are learning as we go. If you have any specific construction questions and can't find the answers in the code book, call your county building department's helpline or ask your inspector.
They say there is no such thing as a dumb question, but they haven't heard some of mine!