2010
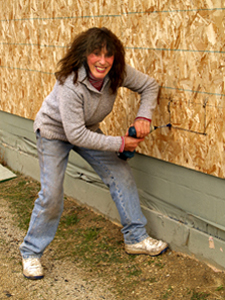
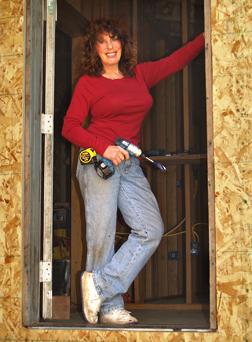 Dorothy taking a break from drilling holes
Building Eric's House
Part 3
by Dorothy Ainsworth
Some might think I don't lead a very exciting life compared to, say, a thrill-seeker, risk-taker, high-roller, or world-traveler, but to me, building a house is just as challenging and fulfilling on a daily basis as any of the above, and the end result is probably more tangible and long-lasting.
For example, I had never wired an entire house myself, so when I recently passed the rough-electrical inspection with flying colors, I couldn't wipe the smile off my face. I cheerfully told the good news to everyone who had given me their vote of confidence, but couldn't help but cackle with glee when telling the few who had given me nothing but a dour warning: "You can't do that; it's too complicated. Don't even try. You'll get electrocuted!"
Their skepticism reminded me of an old Chinese proverb: "The person who says it cannot be done should not interrupt the person doing it". I pass that advice along: Don't listen to the naysayers, and there will be plenty of them. I've learned the hard way that when you're trying something new, the fewer people who know about it the better!
Actually, wiring is surprisingly straight-forward and doable once you understand the basics. Electricity likes to follow the path of least resistance so that's what you give it. If it tries to go somewhere it shouldn't, you break its neck with the circuit breaker. But if you accidentally stop it enroute with your finger, it'll bite back; you will be the path of least resistance because you are 2/3's water. Other rules are also common sense: Power-hungry appliances get bigger wire and light switches get smaller wire. It's all so logical, and the work itself is quite methodical.
 Electrical hand tools used in wiring job
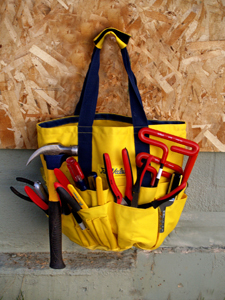 Bag of tools handy to move around as I worked
As always, my M.O. is to research and then if necessary, do more research. I hit the how-to manuals and the internet and find out everything I can about each stage of building before proceeding. My mantra is "one tiny step at a time" and before I know it I'm staggering to the finish line (old motorcycle racing knee).
Our biggest challenge is financial. It's really tough to rake up enough money to complete each stage of construction by the deadlines (every 6 months). For instance, we had to complete the entire framing job, cover it with exterior sheathing, and put the roof on before we could get the electrical inspection.
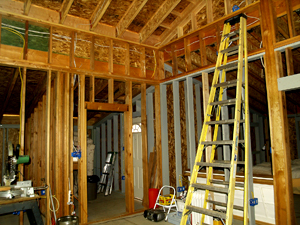 One view of the living room
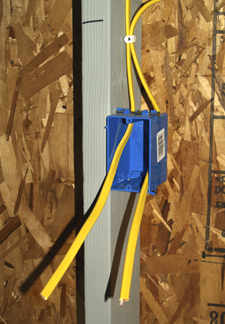
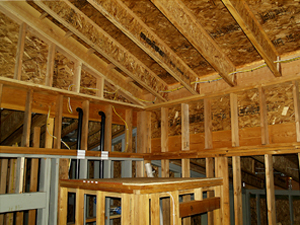 More wire pathways
But excuse me, what if something isn't right with the framing after all the holes are drilled and all the wire is in? Fortunately, we didn't have to contemplate that scary concept because we passed the framing inspection with flying colors, so I'll let THAT go, but what exactly are "flying colors?"

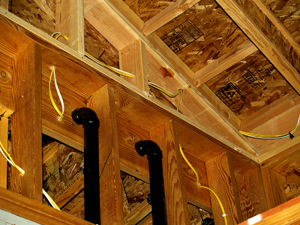 Wires routed near ceiling
 Building permit "Job Card" for signing off inspections
The frustrating thing about permits is that the plumbing and electrical permits are separate entities independent of the building permit, and each have their own 6-month deadline between the rough and final inspections. But before the final electrical inspection can be done---meaning everything electrical is working and all the face-plates are on---the insulation and sheetrock have to be installed! The only way we can make that time-line work is to get an extension on the final electrical so it will coincide with the other two 6-month-apart inspections.
I would love to be Wonder-Woman, and Eric would love to be Superman, but we just happen to be Older-Woman and Piano-Man, with every extra cent between us going into materials for the house. Together we make a six-figure income but the decimal point is in the wrong place! The good news is though, we are squeaking by and making progress.
Sometimes I fantasize about calling in a crew to do the two big itchy and messy jobs (fiberglass insulation & sheetrock), but alas, it is just a pipe-dream without the pipe.
I have to admit that one rainy morning, out of curiosity and wishful thinking, I did call a contractor to get a ballpark figure on each of those jobs, and his quote was a predictable 3 times what it would be if we did it ourselves and only had to buy the materials.
It was a good reminder why we are building the house by ourselves. And why, if you are economically challenged, you should too! Someone else's time and energy is understandably and justifiably valuable and costly. Hard labor is no picnic, and skilled labor is worth every penny if you have the extra pennies. For us, there is simply no alternative but to keep on keepin' on. Squeak, squeak...
One thing that keeps me going is what I call MY 'fairness doctrine' : "Nature is the great equalizer". After the completion of every difficult task, I feel a great sense of personal satisfaction, and that makes it worth every drop of sweat (and sometimes blood) it took to get there.
My Christmas Lampoon Vacation
Eric was unusually busy in his piano-tuning business during the Christmas holidays, so I took over the job of doing the electrical work solo. I preferred it that way; I like to take my time and have no distractions on jobs that can afford no mistakes. When it comes to fiddling with wires, even ten fingers are sometimes too many.
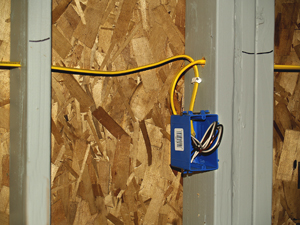
Mounting the outlet boxes was no problem, but routing hundreds of feet of wire throughout the house took some master planning.
It was challenging but fun---like planning a trip without leaving home. All the wires take off from the same location (electrical panel) and race around into every room via a maze of straight-aways, hairpin turns, clover-leafs, tunnels, not to mention going straight-up, straight-down, and horizontally daisy-chained all around, and end up in their little parking garages (the boxes).
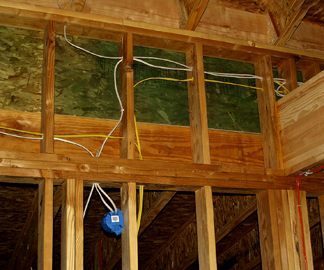 Wires enroute to their respective boxes
 Hairpin turn
My good friend Russ Whitaker, a retired electrician and seasoned citizen, helped me decide on how many feet of each size wire I'd need for receptacles and light switches and smoke alarms, and how many feet of the large-capacity wire (4/3) I'd need to connect the main 125 AMP panel outside to a 60 AMP sub-panel inside. And after I got all the holes drilled, he was there to help me pull the longest runs through so they wouldn't get tangled.
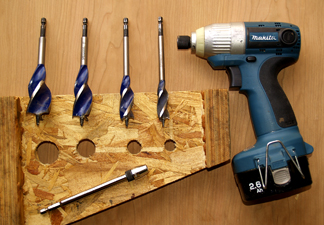 Impact drill and asst. power-bore bits (1.25", 1", 3/4", 5/8")
For a month of evenings in the dead of winter I trudged up to the building site alone, went inside the cold dark cavernous house (Doctor Zhivago's ice-castle comes to mind), clicked on the fluorescent shop-light, put on my favorite CD's of "Oldies But Goodies", and proceeded to drill pre-planned holes through studs with various sized power-bore bits. The size bit depended on the number of wires and their respective sizes that would be pulled through the holes.
Some of the pathways had to run through the pony-wall studs high up near the ceiling, so I climbed the 12-foot ladder in sync with the beat of the music, and stopped swaying to the rhythm just long enough to thrust a sharp loud impact drill into the center of a stud!
 Up, up, up to drill more holes to route wires through
Sashaying around and singing along to nostalgic old tunes while positioning myself for the next series of holes made the grueling job almost enjoyable! I drilled about a hundred holes and threaded 1500 feet of wire through them, while being serenaded by Van Morrison, Gordon Lightfoot, and Elvis Presley crooning their hearts out to machine-gun-like clatter and flying wood chips.
Note: Being safety-oriented, I concentrated all my forces intensely during the moments I was actually drilling. It's not easy work and one can't EVER be cavalier about using power tools!
Mounting the assorted boxes, with wire-size in mind:
The first step in the wiring process is to install all the boxes in the entire house (and in my case, the basement too). That includes the boxes for all light fixtures, ceiling fans, smoke alarms, and porch lights. The plug-circuits take 12/2 wire, the lighting circuits take 14/2 wire, and in order to connect all the smoke alarms to one another, 14/3 wire. Three-way light switches also take 14/3 wire: the extra wire is used to "daisy-chain" in and out of those particular switches. 12/2, 14/2, & 14/3 mean 2 conductors AND a ground, or 3 conductors AND a ground. Code requires that you match the cubic-inch-size of an outlet box to the number and sizes of the wires it will contain.
(Check NEC: the National Electrical Code).
 Wish they were all this simple
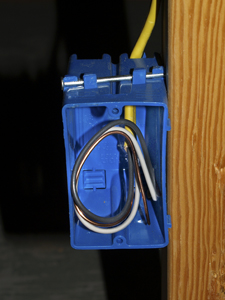
Use a bigger or deeper outlet box where you'll have three or more Romex wires coming in and/or exiting a box. I prefer a double-wide square box with a single face plate on the front, so it matches all the others but has more room inside. I used narrow but deeper boxes where I put GFI receptacles because they are bulkier than regular receptacles. (I don't like crowded conditions in my own personal space OR in electrical boxes!)
Note: All our wire was ROMEX wire, which means it has a protective sheathing over the smaller insulated wires inside.
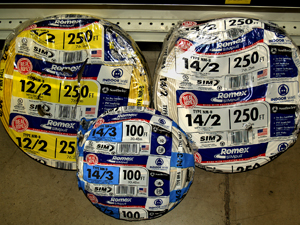 The 3 most common sizes used to wire a house: 12/2, 14/2, 14/3
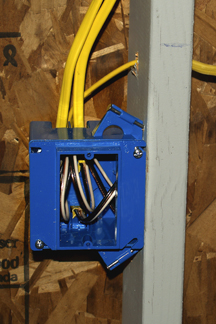
 12/2 Romex wire in standard outlet box
Eric and I bought the least expensive (UL approved) nail-on-type plastic boxes because we had to buy 60 of them. They were on sale at Home Depot for only 25 cents each, so price was the deciding factor. I would have preferred the more expensive metal boxes that come with a built-in bracket or a tab with screw holes for ease in mounting to the studs. The better boxes also have knock-out holes that take a Romex connector for clamping down on the wire entering the box instead of a one-way plastic tab that sometimes cracks off.
By using cheaper boxes, I ended up having to hammer away on a total of 120 diagonally-set nails while trying to keep a consistent 1/2 inch of the plastic box protruding past the face of the stud so it ends up flush when the 1/2 inch sheetrock goes on.
One thing you DON'T want to do is allow the box to stick out MORE than 1/2 inch, or your future face plate won't fit flat against the finished wall. Horror of all horrors!
In construction, the saying: "Don't sweat the small stuff" does NOT apply. Inaccuracies are compounded as you move on to the next stage, so at least STRIVE for perfection! But if you DO make a mistake there's ALWAYS a solution. You may have to get a little creative and 'think outside the parallelogram', but that in itself is rewarding ---AFTER you fix it.
Outlet boxes can be placed anywhere from 12" to 48" off the floor. In kitchens, 42" high (or 6" above countertops) is best. I chose 16" to the bottom of the boxes for the lower receptacles, for ease in installation and use, and 48" for the upper switches. I cut a 16-inch and a 48-inch 2x4 for instant measuring sticks. Then I ran the lower wires horizontally through holes I drilled at 24 inches off the floor.
 Single face plate frame on double box
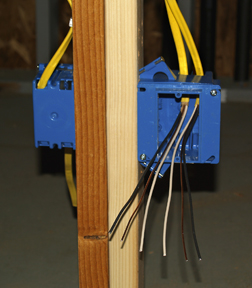
 Switch box containing wires for 3-way switch
It pays to be consistent so you'll know approximately where all the veins and arteries are "hiding" inside the skeleton of your house after it's covered up. All holes must be drilled in the MIDDLE of the 2x6 studs for wire protection. If for some reason you have to drill closer to the edge, a metal plate ( 1.5"x 5") has to be fastened on the stud's edge so the wire can't be punctured someday by a zealous picture-hanger with a big hammer and long nail.
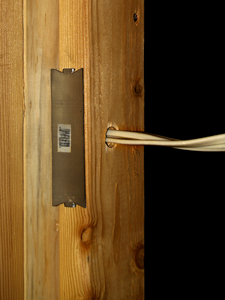 Metal plate used where wire was too close to the edge
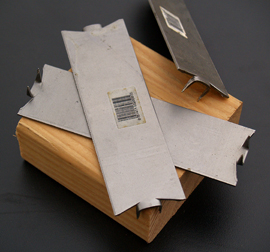 Metal stud plates
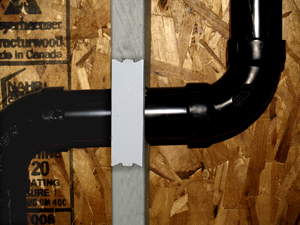 Metal stud-plate protects pipe
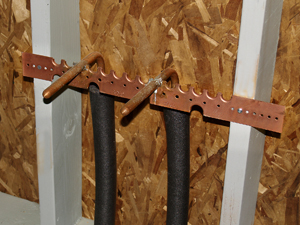 Copper protective plate and support
 My favorite tool
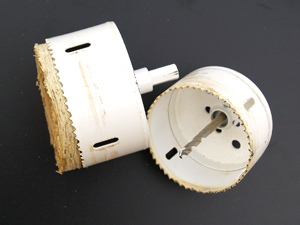 Hole saws for porch lights and other round boxes (3" dia. & 4" dia.)
Code requires an outlet box every six feet along a wall in every room, and GFCI receptacles near sinks and basins. (Ground-Fault-Circuit-Interrupter) A GFI (for short) senses the tiniest imbalance in current between the plug prongs in a receptacle, and trips the breaker immediately instead of electrocuting a careless person who drops a hair dryer into the basin or an absent-minded person standing in a puddle while plugging in a shaver. (Same rules apply to kitchen sink mishaps.)
A Few Generalized Rules: (See your local electrical code for specifics):
Bathrooms have to be on their own circuit breaker, not shared with any other room.
Bedrooms also have to be on their own circuit breaker, not shared with any other room, but there's a new rule as of 2006:
The breaker has to be a specialized AFCI (Arc-Fault Circuit-Interrupter) with a reset button on it, and it costs about $40. My inspector said this new law came about because in 2006 alone 60,000 fires started in bedrooms from plugs in receptacles "arcing" and causing "sparks to fly". Then he raised his eyebrows with a look that said: "Don't ask, don't tell"---just buy the breaker.
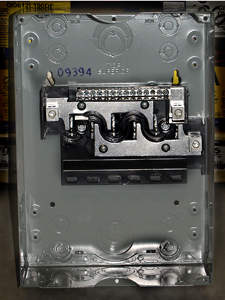
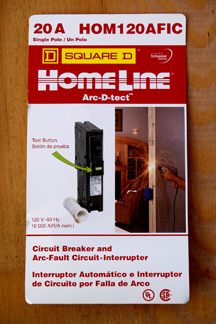 Arc-fault-interrupter breaker for bedroom
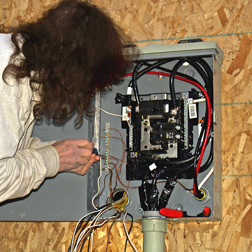
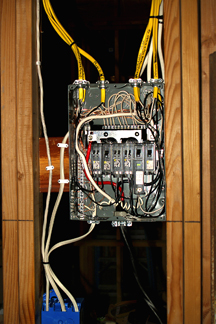
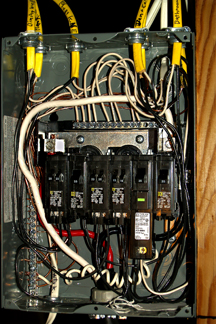 Sub-panel wired. Note: Longer breaker on the right is the arc-fault
interrupter with green reset button
Sub-panel wired. Note: Longer breaker on the right is the arc-fault
interrupter with green reset button
A bathroom with a shower and/or tub HAS to have a fan vented to the outside to whisk out damp air.
 Bathroom-wall anatomy
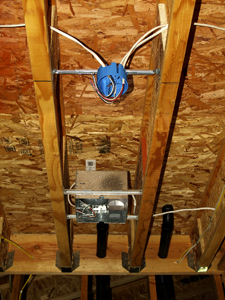 Bathroom light-box and bathroom fan-box mounted between rafters
A bathroom heater has to have its own "dedicated" circuit with its own breaker.
A closet has to have a "cool" fluorescent light, not a comparatively "hot" incandescent light.
Every porch and/or deck has to have an accessible weatherproof box with a GFI receptacle in it, and a porch light above.
The latest code calls for ALL receptacles to be child-proof, whether you have children or not. They are 3 times more expensive but it's now the law. (80 cents vs. $2.50)
Where the wire originates:
Because I installed a SUB-panel in the kitchen and it was connected by heavy wire (4/3) to the MAIN panel just outside the basement, I had TWO panels to work on, each with different wire requirements, AMP ratings, and circuit breakers serving different areas (upstairs and the basement).
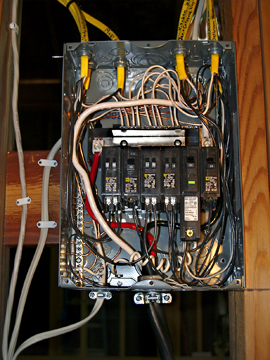
The main service panel:
Power from a source (power company) comes into the MAIN SERVICE PANEL via four large wires: A neutral, a ground, and two seriously scary black wires (120 volts each) that are connected by allen-headed lugs to the main breaker. The gauge of those hot wires depends on the size service you need (125 AMP or 200 AMP or more). Those two extra-thick wires feed two hot bus-bars that the circuit breakers are attached to. But that's only the half of it. The other two wires feed two more bus-bars that are grounded to the panel and thus NOT HOT. One is the ground-bar that has all the ground wires screwed into it (and trips a breaker in the event of a short or overload) and the other is the grounded neutral-bar that has all the white wires screwed into it.
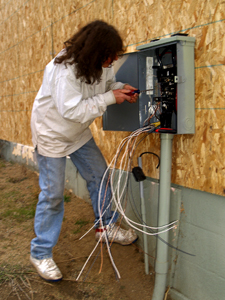 Dorothy hooking up the basement wires in main service panel
 Securing all the ground wires and all the white wires to the proper busbars
The thick ground wire (#8 minimum) goes into the ground via a ground-rod, or in our case, a rebar stub left sticking out of the basement wall that is attached to all the rebar in the basement slab, creating a "whole house protector".
The basement wiring:
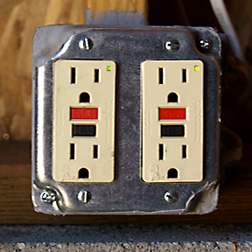 Temporary GFI's in basement
The extra amperage in the MAIN service panel (after deducting the 60 AMPS going to the sub-panel) feeds all the basement receptacles and lights. The inspector required all receptacles in the basement to be GFI's because it has a concrete floor that may get damp or wet. A GFI can be daisy-chained in a series of regular receptacles ($2.50ea.) after installing the more expensive GFI receptacle ($20.ea.) in the FIRST box, which then protects them all.
There's another rule for wiring in a basement if it's considered an unfinished space with any exposed framing (like pony walls): You are not allowed to drill holes and run Romex wire horizontally through all the studs; you have to run the wire vertically up one stud and down the other through holes in the top plate instead. The reason is so you won't be tempted to hang things from that horizontal wire. (People used to dry their clothes on it!)
The sub-panel:
Sizing the sub-panel to fit Eric's household needs took some careful planning and calculations. I chose a medium-sized box that would accommodate just enough 20 AMP circuit breakers to handle all the plugs and enough 15 AMP breakers to handle all the lights. If he ever needs more circuits he can use a couple of double-pole breakers to replace the single-pole breakers. His big appliances will run on propane, so he didn't need any large 240-volt breakers (30A-50A) that straddle BOTH 120-volt bus-bars.
Wiring the sub-panel:
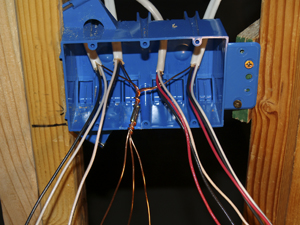
When it comes to connecting up wires, you have to think INSIDE the box. After running the rolls of wire to their various destinations about the house, I pulled a length of each Romex wire into the panel through "knock-outs" (holes) in the panel. Each hole got a Romex connector screwed into it ahead of time to clamp down on the wire where it goes in. I left LONG TAILS of wire (about 2 feet) hanging out so I'd have plenty of routing options to go to breakers and busbars. Wires have to be curved around in generous loops to their destinations, no kinking allowed!
 Nobody home yet
 Everybody home
Each Romex wire that enters the panel from the household circuits is stripped of its sheathing to expose 3 wires in it: a black, a white, and a ground. The black is the hot wire and it goes into its breaker. The copper wire goes into its place in the ground strip (busbar) and the white wire into its place in the neutral strip (busbar). Each strip contains a row of holes with tightening screws in them, and each wire goes into any one of the holes (indiscriminately).
 Romex connectors installed (close-up)
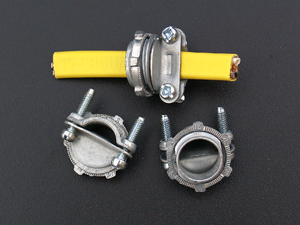 Romex connectors (these are 1/2")
The insulated black and white wires have to be cut to reasonable calculated lengths and then stripped on the ends, exposing 1/2 inch of bare wire to go into the holes. A wire-stripper is made to do that job and has sharp graduated notches on it to accommodate standard wire sizes. The tool strips the insulation off quickly and easily without damaging the wire inside. (The ground wires are already bare copper so simply need to be cut to length and poked into their holes.)
Note: Don't cut wires too short before fastening them to bus-bars and breakers. Leave plenty of extra, even if you have to loop the wires up and down and all around. You may need the surplus length for re-routing someday. Same advice applies to the electrical outlet boxes: Don't cut the wires too short!
Important tip: Label the sheathing on the wires coming in and going out of the panel, ie,, "Hot Wire" (power from main source), Kitchen, Bathroom, Bedroom, Den, Living room, Entrance way, etc. so when it comes time to hook them up to their respective breakers, you'll know which wire goes where. I DID lose track of a couple of runs and had to ask Russ to use a continuity meter at the receptacle end while I turned the breakers on and off in the panel to find which breaker went to which room, and then I labeled it.
Note: It is very important to use the right size breaker for each circuit so there is never an overload. The wrong size could allow wires to over-heat and start a fire.
When the panel work is done, label above or below each breaker with a black marker on the inner metal cover of the panel or on the sticky post-its that come with the panel.
Running wire and attaching wire:
Romex wires have to be attached with various sized insulated staples or zip-ties that come with screw holes, WITHIN 8 INCHES of their outlet box. The local inspector was adamant about this measurement! (Most codes = 12") Romex wires in long runs on beams and rafters can be stapled as far apart as 3 or 4 feet, but check with your local code to make sure. I fastened all my wire-runs more often than was required but that was my preference.
 Code requires stapling wire near box before it goes across (important rule)
 Electrical staples and zip-ties with screw-holes
I recommend taking photos of each and every wall AND the ceiling after the wiring is completed so you have an anatomical map for future reference, especially if your decorating will involve hanging heavy mirrors and paintings.
Preparing the receptacles, switch boxes, and light boxes for the rough-inspection:
 Wire strippers
 Romex sheathing stripped off
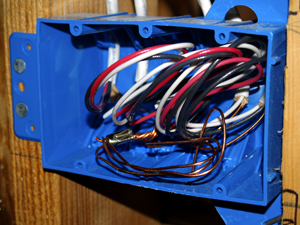
You must strip all the Romex wires of their sheathing, leaving only 3/4" of it on for protection where it enters the box. Then cut the wires hanging out of all the boxes to a generous 6-inch length. Next twist the ground wires together and crimp them, leaving only one copper wire per plug (or switch) sticking out to be attached to a grounding screw at a later date.
 Crimping tool and barrel-crimps and ground-wire-nuts
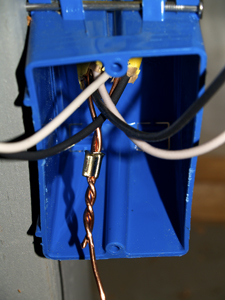
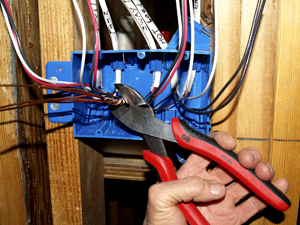 Crimping ground wires
 Switch box that holds 3 switches, so 3 ground wires out of the 4 are left
long but all 4 are twisted & crimped
Switch box that holds 3 switches, so 3 ground wires out of the 4 are left
long but all 4 are twisted & crimped
 Switch box stuffed full
The bare ground wire ultimately has to be protected (insulated) from touching the hot and neutral screws on the future receptacle, so I bought a roll of clear plastic tubing (1/8" dia.) and slipped a 3" piece of it onto the ground wire(s) before carefully coiling and pushing all the wires back into each box. It's customary to install all the receptacles AFTER the dusty sheetrock job is done, and just before the FINAL electrical inspection, so that's what we'll do.
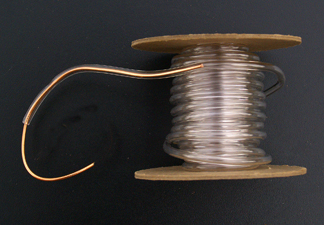 Plastic tubing for insulating ground wires
 Close-up of crimp
Electricity 101:
It must be a hairy ride being a stream of electrons trapped in a wire going 186,000 miles a second but most of the time it just sits in a box until somebody flips a switch, or sticks a knife in the toaster. In the time it takes to react and jerk away from being shocked, that current could have circled the earth twice! It's just good old everyday science but seems like magic to me.
Voltage is always there as a constant ("pressure") supplying the black wires, and amperage is the working current. It is the FLOW of electrons being used by various receptacles and lights and devices and it loops back to the panel via the grounded white wires to complete the circuits.
Think of voltage as water in a hose under a constant pressure (120 volts) and amperage as the FLOW (volume) of water when you turn the faucet on (ie., 20 AMPS)
Wattage is a measurement of the rate of power CONSUMED by a device. For example, a 120 volt circuit using 1/2 amp will power a 60-watt light bulb. (Volts X Amps = Watts)
That's all I know and now YOU know as much as I know, so we are both confused!
Some encouraging words:
I am not an expert; I know just enough to get by in wiring a simple house. In this article I'm telling how I did it, not necessarily how YOU should do it. I'm sharing what I've learned in hopes that it may help other economically-challenged home builders save some time and money. And also to show by example that there's no reason to be intimidated in tackling the job; if I can do it, you can too!
There are numerous how-to wiring manuals written by professional electricians and beautifully illustrated with detailed drawings and color photos. (ORTHO books are my personal favorites.) There are also FORUMS on the internet where you can see questions by other do-it-yourselfers and read the answers from licensed professionals---and ask some of your own. (Google your SPECIFIC question to get to those websites.)
"Romancing the Romex":
Being the nerdy "researcher" type, I actually registered to "join" a plumbing-forum and an electrical-forum ----and those chat rooms are now the extent of my exciting social life. I guess you could call me a real live wire!
The total cost of the wiring job:
An electrical contractor estimated the job at $5,000.
I took at least took 4 times longer to do the work than he would have, but saved a cool $3500 on labor alone.
The framing inspection at last!
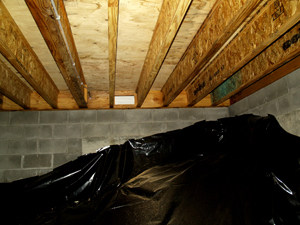 Vapor barrier and vent in crawl space
After passing the rough-electrical inspection, we immediately called to schedule the framing inspection and hurried to get ready for it. One requirement we hadn't done yet was to put a vapor barrier over the 2 dirt crawl-spaces in Eric's partial basement. We bought a 10'x 100' roll of 6-mil plastic for $50, cut it to workable lengths and "nailed" it to the dirt with a few garden staples.
Then we had to put 4 vents in the rim joists surrounding those areas. Code requires one square foot of vent per 150 square feet of crawl space. We had 2 areas of 288 sq.ft. each so we needed two 6"x 24" vents for each space. I volunteered to install them myself so Eric could finally escape to practice the piano.
 Drilling pilot hole to start jigsaw in to cut vent openings for basement
crawl space
Drilling pilot hole to start jigsaw in to cut vent openings for basement
crawl space

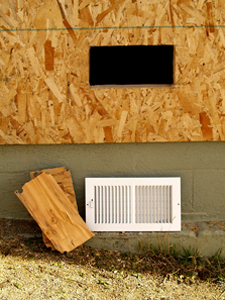 Vent hole and vent
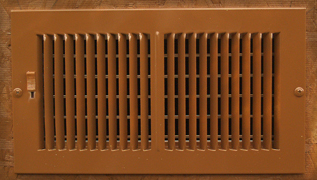 Vent installed - it can be opened and closed seasonally
Instead of buying inexpensive conventional screened vents that stay open, I splurged on louvered floor-vent-registers that can be opened and closed seasonally, and screened them from the inside to make them critter-proof.
The next step:
We passed the inspection without a hitch, and now we're on to the itchy twitchy sneezy fiberglass-insulation job. I for one will be donning an Owens-Corning Pink Panther HAZMAT suit!
 Dorothy's permanently frozen smile after passing the electrical inspection.
 Inside Dorothy's brain